25 mid taper styles for every hair type — with barber scripts, face shape pairings, and real maintenance timelines
A mid taper haircut is a men’s cut where the hair gradually shortens starting at the temple line and blending down toward the neckline, leaving more length on top. It lands between a low taper (which stays tight near the ears) and a high taper (which climbs above the temples) — which is exactly why it works on nearly every hair type, face shape, and lifestyle. These 25 variations cover everything from close-cropped crops to longer textured tops, each with specific styling notes and what to tell your barber.
Below the gallery, you’ll find a face shape compatibility table, a hair type breakdown, a barber script with guard numbers, and a maintenance schedule — so you walk in knowing exactly what you want and walk out with a cut you can actually recreate at home.
Classic Mid Taper Styles
These are the foundational mid taper cuts — the ones barbers execute hundreds of times a week. Clean, versatile, and work across most hair types without needing precision styling products every morning.
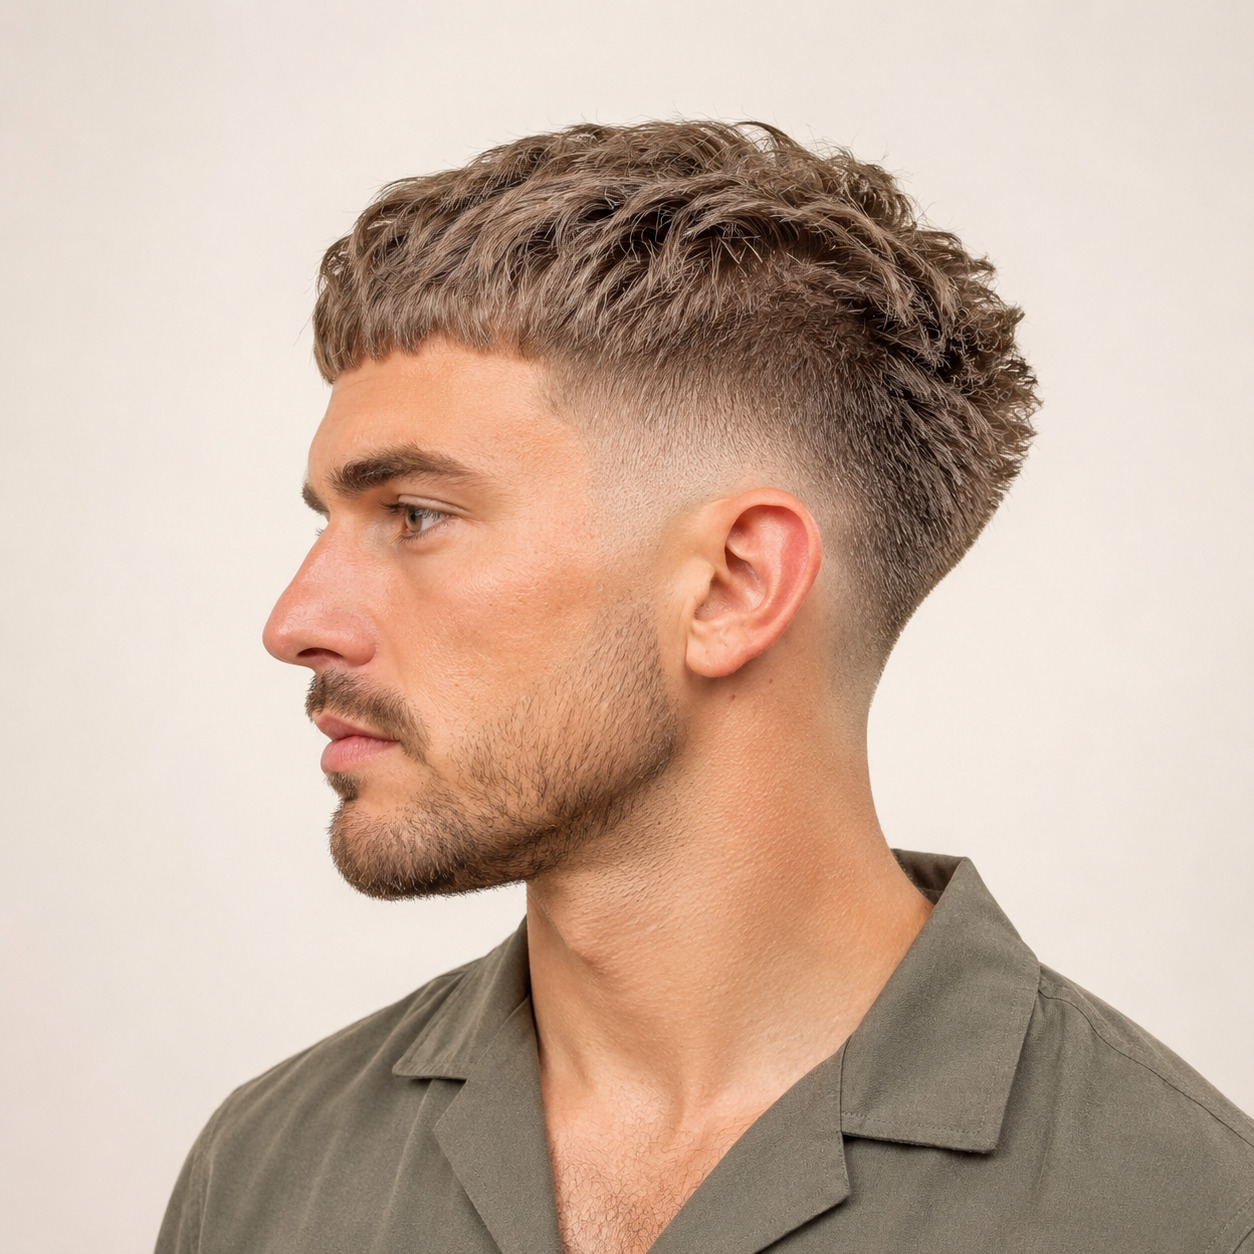
1. Textured Crop with Mid Taper
The textured crop is the most-requested mid taper combination in modern barbershops — the top sits at 2–3 inches with point-cut ends that create separation and movement, while the taper starts at the temple and blends down to a #1 or #1.5 at the neckline. It suits square and oval faces best because the flat, horizontal top line balances both face shapes without adding unwanted height. Ask your barber for a “textured crop with a mid skin fade, leaving about two and a half inches on top with scissor-over-comb finishing.”
2. Comb Over Mid Taper
A comb over with a mid taper works by sweeping the top length to one side, creating a diagonal line across the crown that sits above a cleanly faded side. The hard part — a shaved or clipped line separating the top from the fade — is optional but sharpens the look considerably for professional settings. Men with oblong or rectangular faces get the most from this variation; the side sweep adds width across the forehead rather than height. Fine to medium hair density works best since thick hair can resist the sweep direction without product.
3. Short Buzz with Mid Taper
Running a #3 or #4 on top with a mid taper on the sides is the lowest-maintenance version of this cut — essentially a longer buzz with a graduated perimeter. The taper prevents the blocky, all-one-length look that an unblended buzz gives, adding enough shape to make the cut look intentional. This is the right choice if you want to visit the barber every 4–5 weeks instead of every 2–3, since there’s no styled top that needs to hold a specific shape between visits. Round faces should go slightly longer on top (#4 or #5) to add some height.
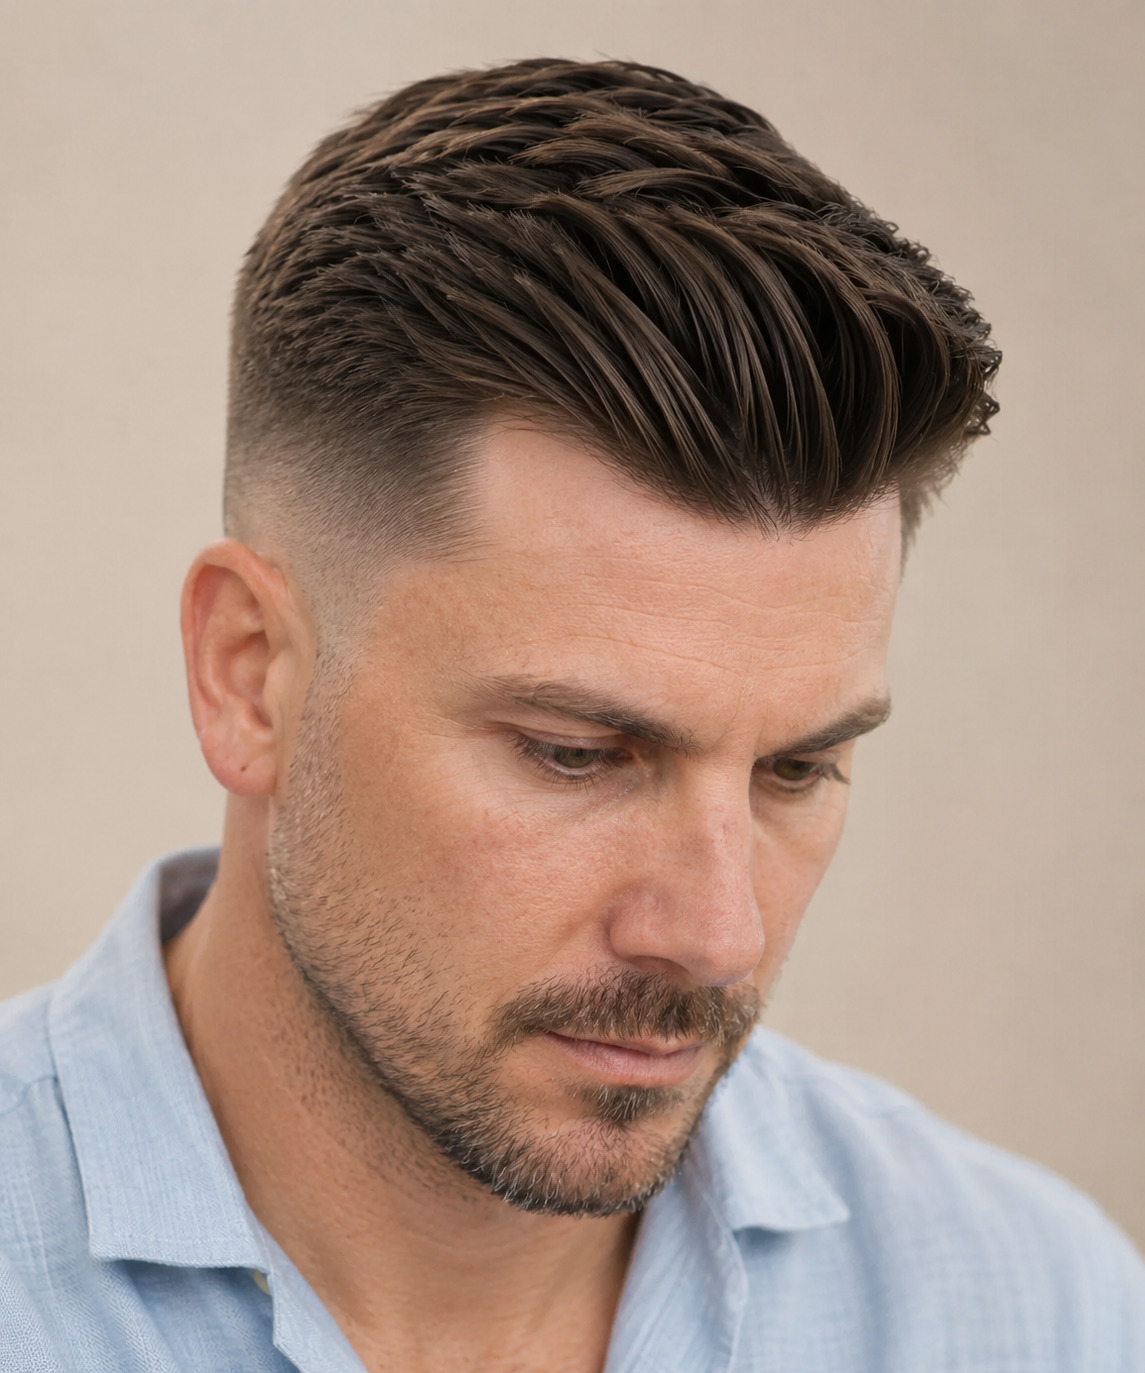
4. Slick Back with Mid Taper
Slicking the top backward over a mid taper gives the cut a polished, boardroom-ready finish that still reads modern rather than dated. The key is enough length on top — at least 3 inches — so the swept-back section has volume and doesn’t flatten completely against the scalp. A water-based pomade gives the hold needed without the heavy, wet look of gel; matte pomades work better for business environments where a natural finish is preferred. Heart-shaped faces benefit most from the slick back because the width at the top complements naturally wider foreheads.
5. Natural Top with Mid Taper
Leaving the top unstyled — just its natural texture, whether wavy, slightly curly, or straight — over a crisp mid taper is one of the more effortless looks in this list. The fade does the structural work while the top air-dries into whatever shape it falls into. Barbers typically use scissor-over-comb on the top rather than clippers to keep natural movement intact. This works on oval faces especially well, since the face shape handles most top lengths and textures without any specific adjustments needed.
Textured and Curly Mid Taper Styles
Mid tapers handle curly and textured hair particularly well — the higher blend point removes bulk from the sides without touching the natural curl pattern on top. These variations are cut differently from straight-hair tapers: the top is almost always shaped dry, and the barber needs to account for shrinkage when determining how much length to leave.
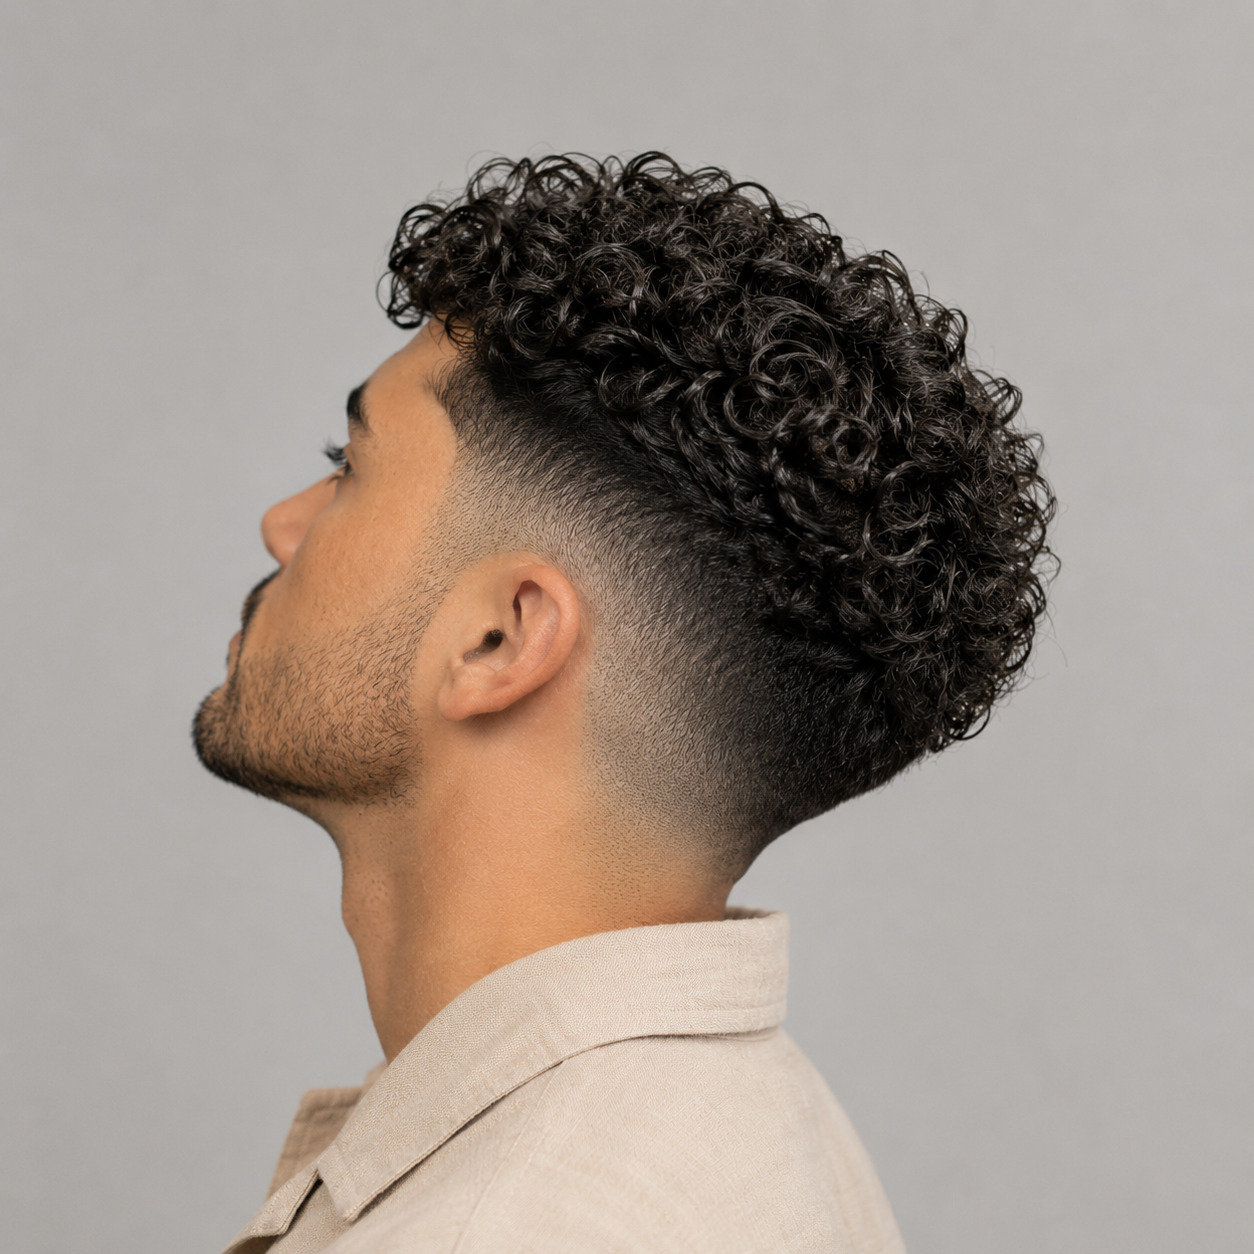
6. Curly Top Mid Taper
Natural curls on top with a mid taper underneath create one of the most visually balanced men’s cuts available — the fade frames the curl mass without competing with it. The critical detail here is shrinkage: a 3-inch curl when wet can sit at 2 inches when dry, so your barber needs to see your curls in their natural dry state before cutting. Ask specifically for the top to be shaped dry, and confirm the fade starts exactly at the temple (not higher) so the transition doesn’t look abrupt against the curl volume.
7. Taper Fade with Twist Out
A twist out over a mid taper works best on 4a–4c hair types, where the two-strand twist method creates uniform coil definition that holds its shape for 2–3 days after styling. The fade keeps the perimeter tight while the twist out adds dimension and height on top without looking unstructured. After a fresh cut, section the top into 1-inch partings and apply a twist-and-lock gel or a light custard before twisting — smaller sections give tighter, more uniform coils. Let hair dry completely before unraveling to prevent frizz.
8. High-Top Crop with Mid Taper
The high-top crop — a square, flat-top silhouette with a mid taper underneath — is a contemporary update on the 90s flat top, scaled down to a more proportional height. Thick, dense hair is a prerequisite; this cut won’t hold its shape on fine or medium density hair without significant product. Barbers typically use clippers with a comb to create the flat ceiling line, then blend the mid taper below the temple. Diamond and oval face shapes get the most from this cut because the square top adds width that rounds out narrow faces.
9. Afro Taper
An afro taper keeps natural hair at its full volume on top and gradually blends it down through the mid taper into the neckline, creating a rounded silhouette with a defined perimeter. Unlike the high-top crop, the top shape here is round rather than flat — the barber shapes the perimeter of the afro using a comb pick and shears to round out any irregularities. Regular maintenance every 3–4 weeks keeps the taper line defined while the afro grows. This works across face shapes but elongates round faces best because the height draws the eye upward.
10. Waves with Mid Taper
360 waves with a mid taper is a look that requires commitment before you sit in the barber’s chair — waves are trained over weeks of daily brushing and durag wear, not achieved in a single cut. The barber’s role is to keep the top short enough (usually a #1.5 or #2) that the wave pattern reads clearly while the mid taper creates a sharp contrast at the sides. The connection point where the waves meet the fade is the most technically demanding part; a skilled barber will blend this zone carefully so the wave pattern doesn’t look cut off.
Long Top Mid Taper Styles
Longer lengths on top with a mid taper create the highest visual contrast in this category — the disconnect between the faded sides and the styled top is most dramatic here. These cuts require more daily styling investment but give the most room for personal expression.
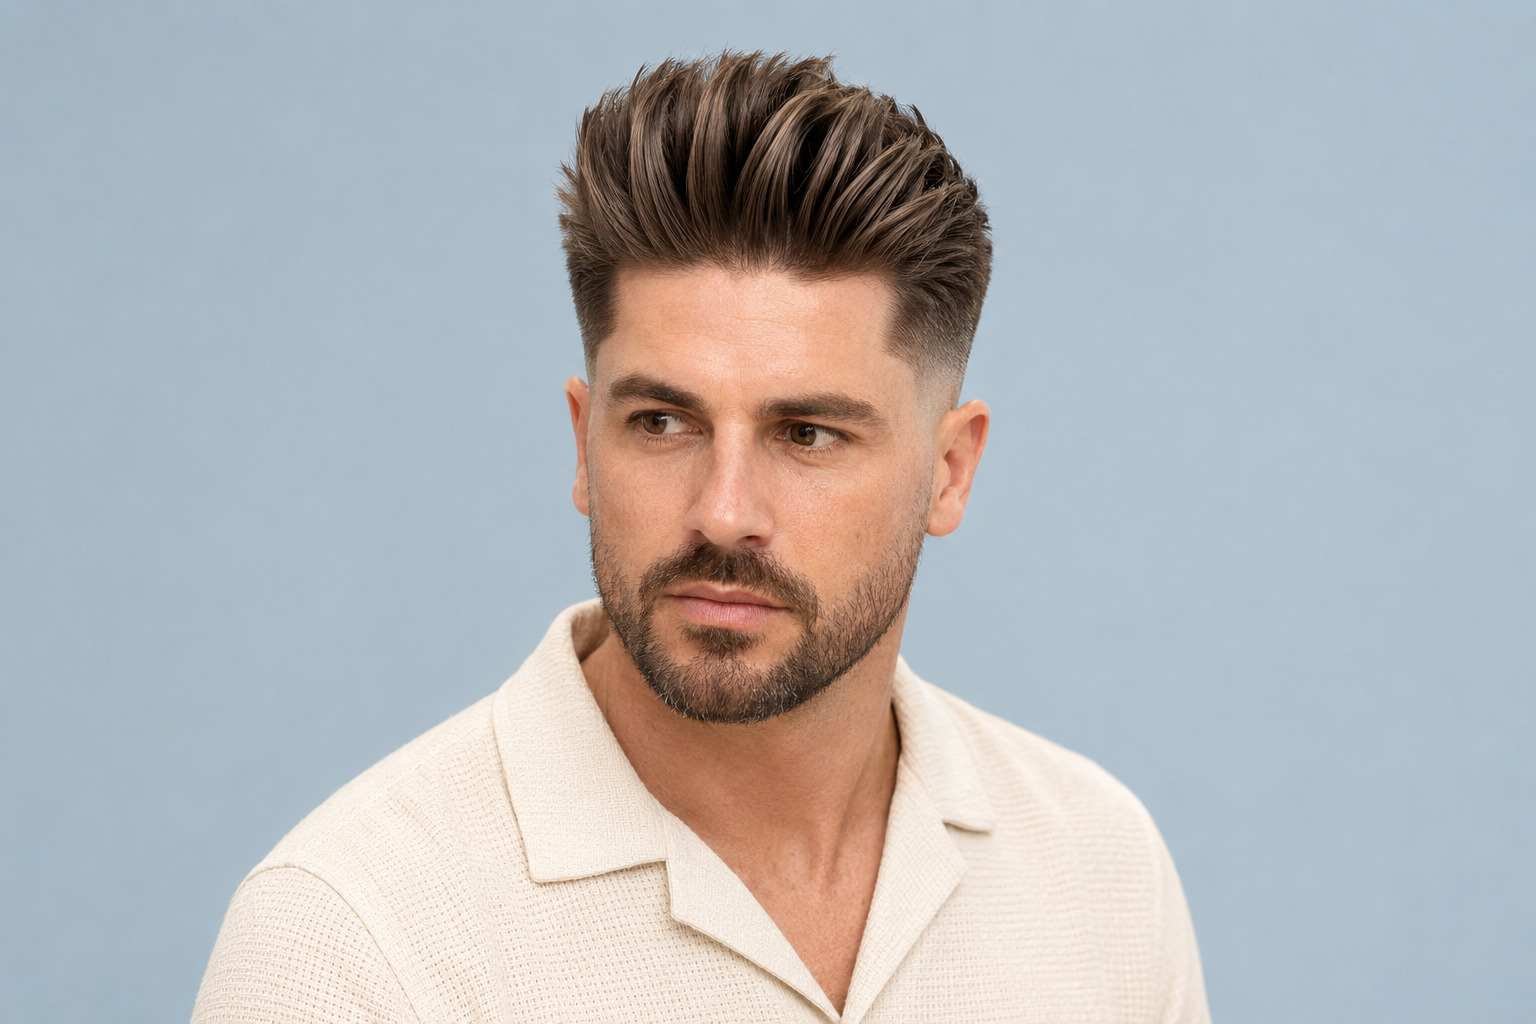
11. Quiff with Mid Taper
The quiff stacks volume at the front of the crown and sweeps it slightly backward, creating a soft upward lift that a mid taper frames cleanly from the temple down. It’s the most volume-intensive style in this article — you’ll need a blow-dryer and a medium-barrel round brush to build the lift, then a matte clay to set it. On windy days or in humid climates, the quiff collapses faster than other styles, so it’s better suited to controlled environments. Barbers typically leave 4–5 inches of length at the front and graduate it shorter toward the back for the quiff to fall naturally forward.
12. Pompadour Mid Taper
A pompadour differs from a quiff in direction — the hair sweeps fully backward rather than forward and upward, creating a sleeker, more vintage-inspired silhouette. With a mid taper, the contrast between the high-volume top and the faded sides is the central design element. This cut needs at least 4–5 inches on top to achieve the swept height; shorter lengths won’t hold the lift without excessive product. A strong-hold water-based pomade gives the most control without stiffness; apply it to slightly damp hair for easier manipulation before blow-drying the shape in place.
13. Flow with Mid Taper
Flow — longer, swept-back hair that moves naturally — works with a mid taper when the top is kept at 4+ inches and allowed to fall loosely backward or to the side. This combination is popular among athletes because the top has enough length for personality without the fade looking overgrown. Wavy hair gets the best results from this style since the natural texture adds movement that straight hair has to achieve with product. Keep the sides from looking disconnected by ensuring the taper blends gradually — a sharp skin fade here would make the contrast look jarring against the longer, softer top.
14. Curtain Style with Mid Taper
Curtains — a center-parted style where the hair falls on both sides of the face — have moved firmly into mainstream men’s grooming, and they pair cleanly with a mid taper when the length is kept at 3–5 inches. The center part should fall naturally without being forced; if your hair doesn’t want to part in the center, a wide-tooth comb with a small amount of pomade while hair is damp will train it over time. This style softens angular features and works particularly well on square and diamond faces where the hair framing the forehead draws attention away from a strong jaw or wide cheekbones.
15. Fringe with Mid Taper
A textured fringe swept forward over a mid taper fills in the forehead, which makes it one of the better options for men with longer faces who want to reduce visual length. The fringe length typically sits just above the eyebrows or grazes them — any longer and it reads as overgrown rather than styled. Fine-to-medium hair works better here than thick hair, since thick fringes can look heavy and block-like without regular thinning. Ask your barber to point-cut the fringe ends for a softer, less blunt edge that sits naturally without needing to be pressed flat.
Designed and Statement Mid Taper Styles
These variations add a visual element — a line, pattern, or structural detail — to the base mid taper. They require a barber comfortable with precision clipper work and need more frequent touch-ups to keep the design sharp.
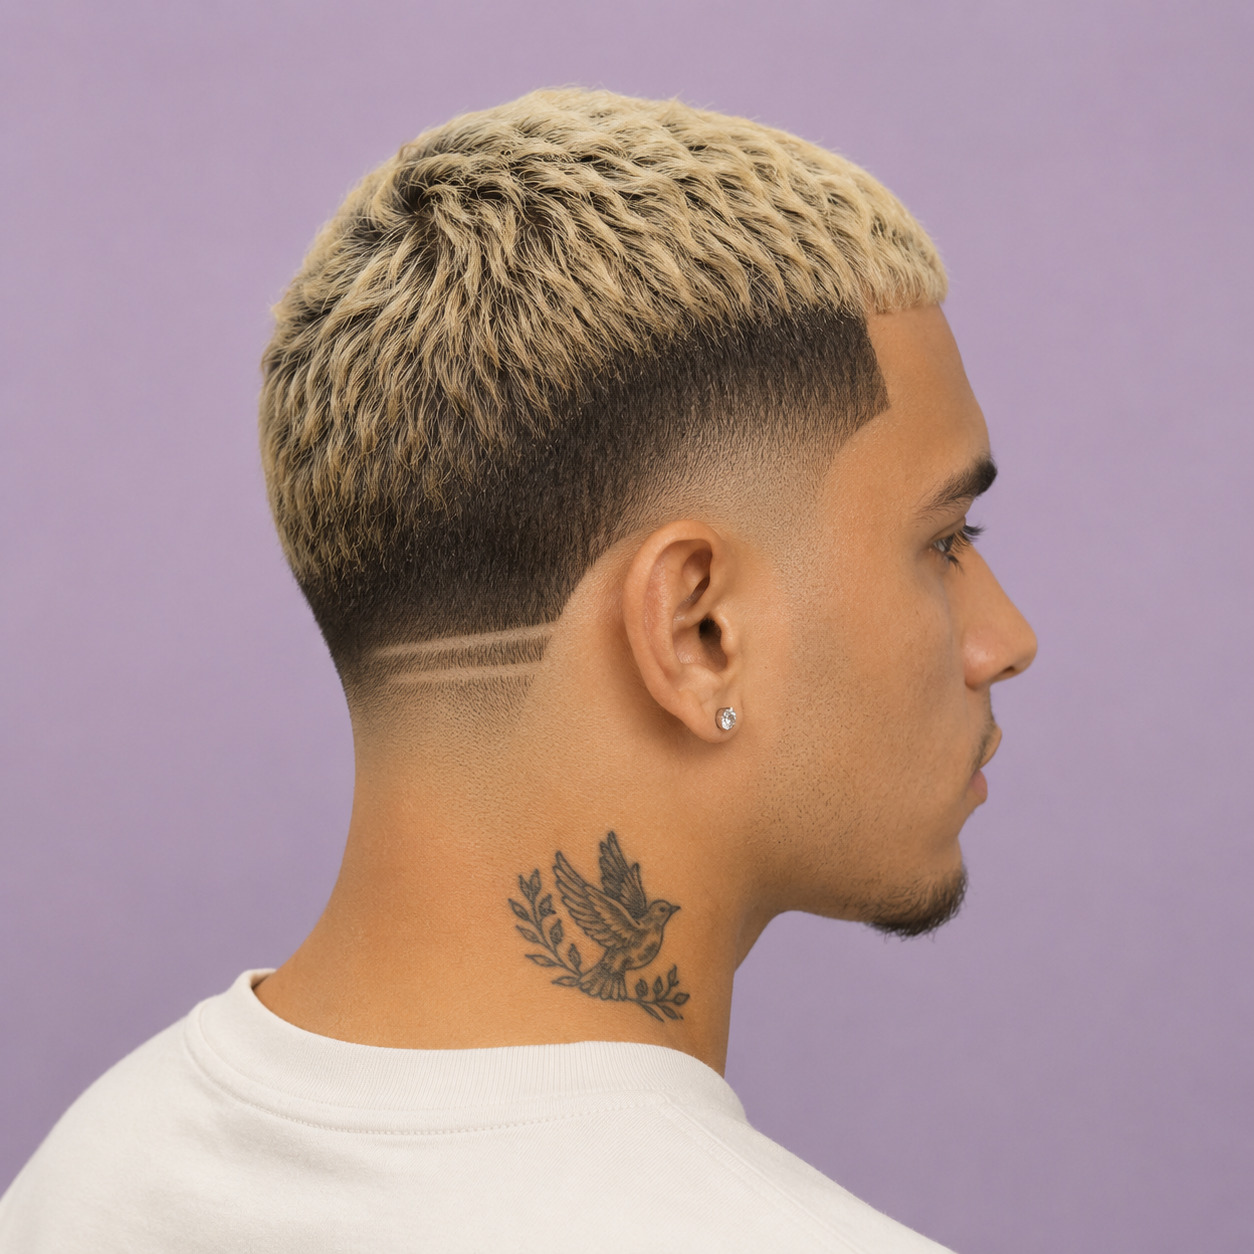
16. Mid Taper with Hard Part
A hard part is a shaved line — usually 1–2mm wide — that marks the parting on one side, creating a permanent, precise separation between the top and the taper. It sharpens any comb over or side-swept style considerably and photographs well because the line creates a clear structural element. The downside is that it grows in within 10–14 days and looks noticeably dull before your next barber visit. If you can’t maintain 3-week visits, a natural part achieves a similar effect without the upkeep requirement.
17. Mid Taper with Line Up
A line up — also called an edge up — creates a straight, geometric hairline across the forehead and at the temples using a T-outliner or zero-gap clipper. It adds a sharp, architectural quality to the mid taper that looks particularly clean on straight hairlines; naturally curved or uneven hairlines may need some adjustment to the line placement for it to look balanced. Line ups grow in faster than the taper itself, so if you want this detail to stay fresh, a 10–14 day touch-up appointment is realistic. It adds about 10 minutes to the total barber service.
18. Mid Taper with Shaved Design
Shaved designs — lines, geometric shapes, lightning bolts, or custom patterns — are carved into the faded section using a razor or T-outliner. The mid taper’s placement above the temple gives barbers more surface area to work with compared to a low taper, which makes it a better base for detailed artwork. More elaborate designs add 20–30 minutes to the appointment and fade significantly within the first week as the surrounding hair grows in around them. Keep designs simple if you’re visiting the barber on a monthly schedule; intricate work looks its best for the first 7–10 days.
19. Drop Fade Mid Taper
A drop fade curves downward behind the ear rather than staying horizontal around the head, creating an arc shape that follows the ear’s natural curve more closely. When this drop technique is applied to a mid taper, the fade line dips lower at the back of the head than at the temple, adding a curved element to what’s otherwise a straight horizontal blend. Barbers use this technique when clients want a mid taper that transitions more naturally into the neckline without a hard horizontal line visible from the back. Round and oval faces tend to suit the drop fade’s curved geometry.
Mid Taper for Specific Hair Types
The mid taper’s starting height makes it more effective than a low taper at managing dense or voluminous hair — it removes bulk earlier on the sides, which reduces the puffiness that low tapers can leave on thick and curly hair types. The table below maps hair type to the most effective mid taper variation.
| Hair Type | Best Mid Taper Style | Key Barber Instruction | Product to Use |
|---|---|---|---|
| Fine / Thin | Textured crop, Buzz | Keep top shorter (2–2.5 in) — length flattens fine hair | Lightweight volumizing clay |
| Medium / Straight | Comb over, Quiff, Slick back | 3–4 inches on top; scissor finish for movement | Matte clay or water-based pomade |
| Thick / Dense | Pompadour, Slick back, Hard part | Ask for interior thinning on the top to reduce bulk | Medium-hold matte pomade |
| Wavy | Natural top, Flow, Curtains | Shape top dry; wet cutting changes the natural wave fall | Light hold cream or sea salt spray |
| Curly (3a–3c) | Curly top, Afro taper | Cut dry; confirm desired length accounts for shrinkage | Curl cream or defining gel |
| Coily (4a–4c) | Twist out, Waves, Afro taper | Discuss shrinkage ratio before cutting; cut at natural state | Twist-and-lock gel or curl custard |
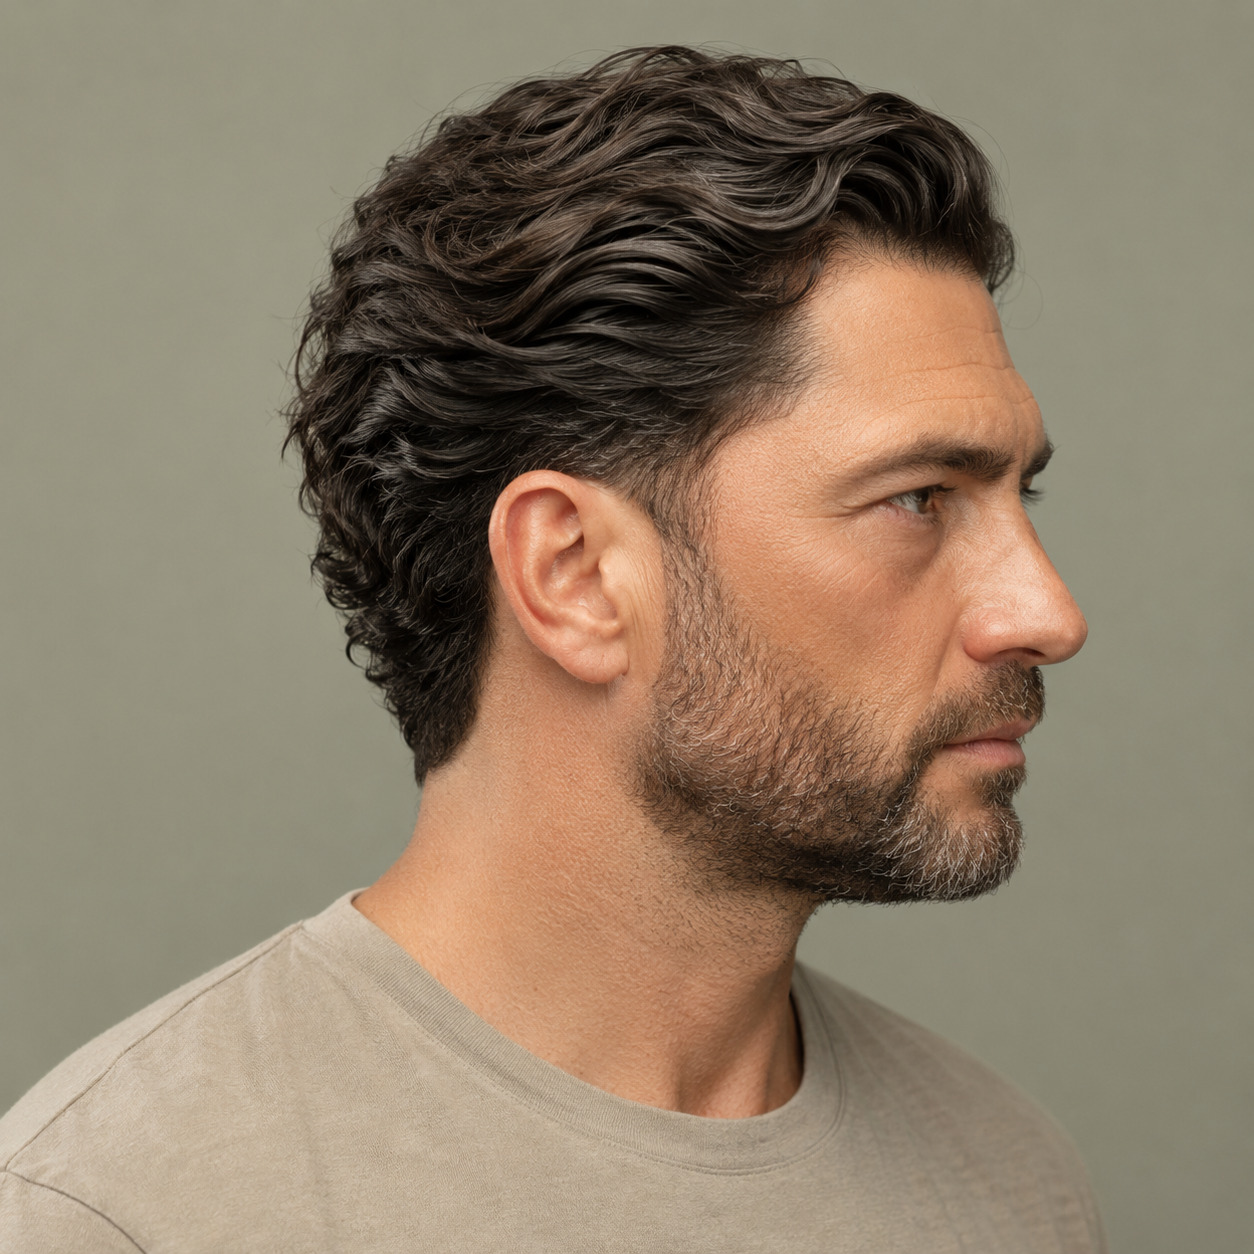
20. Mid Taper for Fine Hair
Fine hair and long tops don’t cooperate — the weight of more than 2.5–3 inches flattens fine hair against the skull, eliminating any texture or volume. The best approach for fine hair is a textured crop kept at 2–2.5 inches, with point-cut ends that create the appearance of density through separation rather than actual thickness. A lightweight clay gives the texture needed without weighing the hair down further; avoid heavy pomades, which flatten fine hair against the scalp within an hour of styling.
21. Mid Taper for Thick Hair
Thick hair holds almost any mid taper style well, but the challenge is managing bulk — without interior thinning on the top, thick hair can look heavy or mushroom-shaped between the top length and the fade. Ask your barber to thin the interior of the top section using thinning shears before shaping the outside perimeter; this removes weight without visibly shortening the length. The pompadour and slick back work particularly well for thick hair because the density gives natural hold to the swept shape without needing much product.
Additional Mid Taper Variations
These four styles round out the gallery with distinct structural approaches — a mullet hybrid, a blowout, a skin fade version, and a disconnected variation — giving a complete picture of how far the mid taper can extend beyond its classic form.
22. Mullet with Mid Taper
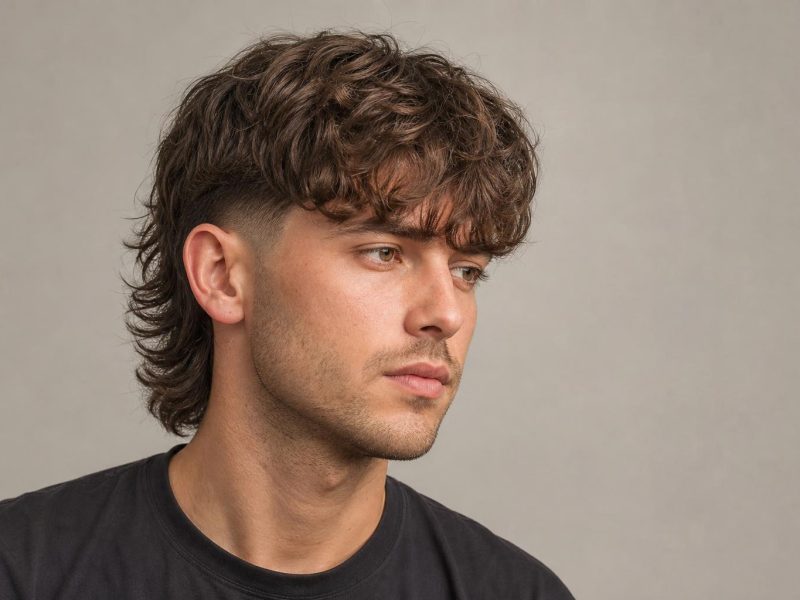
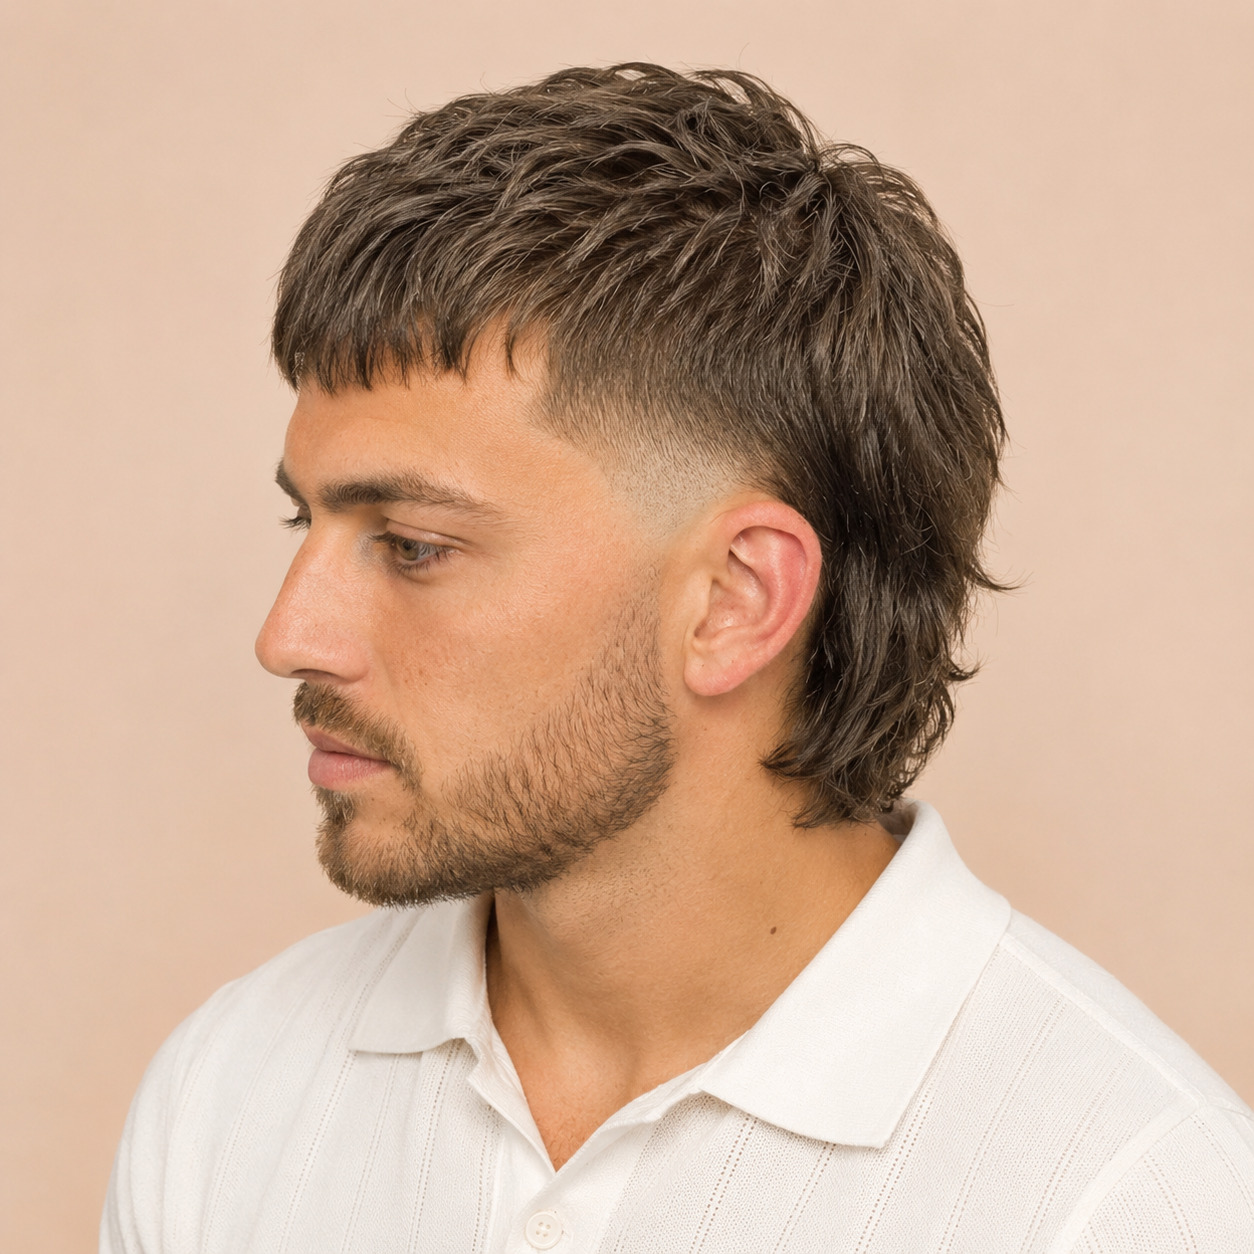
The modern mullet with a mid taper keeps the sides short and faded while leaving the back section noticeably longer — typically 2–4 inches past the neckline. The result is a business-in-the-front, relaxed-in-the-back shape that reads as intentionally directional rather than accidental. This works best on straight or slightly wavy hair where the nape length falls cleanly without bulk. Ask your barber to blend the mid taper into the nape length gradually rather than creating a hard line where the taper ends and the length begins.
23. Blowout Mid Taper
A blowout mid taper uses the blow-dryer as the primary styling tool — the top is dried upward with a vent brush, building height and volume, while the mid taper keeps the perimeter clean. The result has a rounded, voluminous silhouette that works particularly well on oval and oblong faces. This style is high-effort daily: without a blow-dry, the top collapses flat. Factor in 10–15 minutes of styling time every morning; the payoff is a cut that looks salon-fresh because the volume reads as intentional rather than natural.
24. Mid Skin Fade
The mid skin fade takes the standard mid taper all the way down to the skin rather than stopping at a short clipper length — the hair disappears completely at the base rather than finishing at a #0.5 or #1. The contrast is sharper and the fade needs rebalancing every 2–3 weeks as the hair at the skin line grows in visibly faster than the surrounding faded area. Square and oval faces handle the high contrast of a skin fade well; round faces should consider a longer top length to compensate for the extra side definition that a skin fade creates.
25. Disconnected Mid Taper
A disconnected taper intentionally skips the blending step — the longer top and the faded sides don’t gradually merge; instead, there’s a visible contrast line where one length ends and the other begins. This is the most fashion-forward variation in the gallery and is common in European and Korean men’s styling. The lack of blend means the cut grows in quickly and looks intentional only when fresh; plan barber visits every 2–3 weeks to maintain the disconnect. This works best with straight or medium-texture hair where the top length holds a clean edge without flyaways breaking the contrast line.
Mid Taper Face Shape Guide
The mid taper’s starting point at the temple means the sides are tighter than a low taper without the complete side-clearance of a high fade — which gives it a useful range across face shapes. The table below maps each face shape to the most compatible top style and key adjustments to request.
| Face Shape | Best Top Style | What to Avoid | Key Adjustment |
|---|---|---|---|
| Oval | Any — most versatile face shape | Nothing specific | Focus on what you like; oval faces balance any top |
| Round | Quiff, Pompadour, Textured crop | Flat buzz, Curtains with low volume | Add height on top to elongate; keep sides tight |
| Square | Textured crop, Curtains, Comb over | Hard flat tops that add width | Softer top edges reduce jaw angularity |
| Oblong / Rectangle | Fringe, Curtains, Natural top | Quiff, Pompadour — these add length | Forward-falling fringe reduces perceived face length |
| Heart | Slick back, Comb over, Quiff | Side-heavy styles that emphasize forehead width | Keep volume at the crown, not the sides |
| Diamond | High-top crop, Afro taper | Tight buzz — narrows an already narrow chin | Width at the top balances narrow chin and narrow forehead |
What to Tell Your Barber: The Mid Taper Script
Most miscommunication at the barber happens when clients use vague language — “clean on the sides” or “not too short” gives a barber nothing actionable to work with. The exact terms and guard numbers below translate your preferences into language a barber can execute.
Stylist tip: Bring a photo from this article to your appointment — not to copy the style exactly, but to show the barber the contrast level and placement you’re after. A photo communicates more precisely than any verbal description.
Base script for a standard mid taper: “I’d like a mid taper fade, starting at the temple. Leave about [X inches] on top, and blend the sides down to a [#0.5 / #1 / skin] at the neckline.”
| What You Want | What to Say | Guard Number |
|---|---|---|
| Subtle fade, some hair remains | “Taper down to a #1 at the sides” | #1 (3mm) |
| Clean, close fade | “Mid fade to a #0.5 at the base” | #0.5 (1.5mm) |
| High contrast skin fade | “Mid skin fade, bald at the base” | Skin / bald |
| Hard line between top and sides | “Add a hard part on the left” | Razor line |
| Crisp geometric hairline | “Add a line up at the hairline” | T-outliner (zero gap) |
| Curved fade behind ear | “Drop the fade behind the ear” | Same as base guard, curved path |
Mid Taper Maintenance Schedule
How long a mid taper stays sharp depends entirely on how close the fade goes at the base and how much top length you’re maintaining. Skin fades show new growth fastest; longer tops give you more buffer time between visits.
| Style Variation | Trim Frequency | Daily Styling Time | Grow-Out Behavior |
|---|---|---|---|
| Textured crop, Buzz | Every 4–5 weeks | 3–5 minutes | Grows out cleanly; stays presentable longer |
| Comb over, Slick back, Natural | Every 3–4 weeks | 5–10 minutes | Top holds shape; fade line blurs by week 3 |
| Quiff, Pompadour, Blowout | Every 3 weeks | 10–15 minutes | Top grows uneven; needs trim to keep shape |
| Mid skin fade, Line up, Hard part | Every 2–3 weeks | 5–10 minutes | Skin grows in fast; looks dull within 10 days |
| Shaved designs, Disconnected | Every 2 weeks | 5 minutes | Design fades within 7–10 days; needs frequent refresh |
Stylist tip: Between full barber appointments, keep a T-outliner or small precision trimmer at home to maintain the neckline and sideburn edges. Cleaning up these two areas every 10–12 days extends the life of the fade by a week without touching the blend itself. It’s a 5-minute habit that makes a significant difference in how sharp the cut looks week three versus a fresh visit.
FAQ
What is the difference between a mid taper and a mid fade?
A mid taper and a mid fade both start blending at the temple, but they’re not identical. A taper keeps some hair length throughout — the hair shortens gradually from top to bottom but never disappears completely. A fade goes down to the skin at the base. So a mid taper has a softer, more natural finish at the neckline, while a mid fade ends at bare skin. Most barbers use the terms interchangeably, so specify which you want: “taper that stays at a #1” versus “fade that goes to the skin.”
How often do I need to cut a mid taper?
Every 2–4 weeks depending on the variation. Skin fades and shaved designs need the most frequent upkeep — about every 2–3 weeks — because the highest-contrast areas show new growth fastest. Textured crops and buzz cuts with a softer taper can go 4–5 weeks before looking noticeably overgrown. If you’re somewhere in the middle (a standard mid fade to a #0.5 or #1), plan on a 3-week schedule.
Can I get a mid taper with thinning hair?
Yes, and it’s often a better choice than a low taper for thinning hair. The mid taper removes more hair from the sides, which reduces the contrast between thinning areas on top and fuller areas at the sides — a common problem with low tapers. Keep the top at 2–2.5 inches max and ask for a textured crop finish, which creates the appearance of density through separation. Avoid high-volume styles like quiffs or pompadours, which require density the hair may not have.
Is a mid taper suitable for professional environments?
Yes — the mid taper reads as clean and well-groomed in almost any professional setting. The most conservative version is a #1 or #1.5 fade (not skin) without a hard part or shaved designs. A comb over or slick back on top pairs particularly well with formal dress codes. The only variations that push into less professional territory are shaved designs and disconnected fades, which read as more expressive than corporate-standard.
What’s the best product for styling a mid taper?
Matte clay is the most versatile option — it gives flexible hold with a natural finish that works on textured crops, comb overs, and quiffs alike. For slick backs and pompadours, a water-based pomade gives more control and a slightly higher sheen. Avoid gel, which flakes once dry and looks dated. For curly or coily tops, skip both and use a curl cream or light custard that defines the natural texture without stiffness. One product rule: always apply to towel-dried hair, not soaking wet — wet hair dilutes product and reduces hold.
How is a mid taper different from a low taper?
The difference is entirely in where the blend starts. A low taper begins just above the ears and stays tight to the natural hairline — it’s subtler and grows out more gradually, which means fewer barber visits. A mid taper starts at the temple, which is higher up, creating more contrast between the sides and top. The mid taper is better for thick or curly hair because the higher starting point removes more bulk; the low taper is better for fine hair or professional settings where maximum subtlety is the goal.
Can I maintain a mid taper at home between appointments?
You can maintain the neckline and sideburns with a T-outliner or home clipper, but re-blending the fade itself is not recommended unless you have clipper experience. The blend requires multiple guard sizes and a practiced eye for where each guard’s line should sit — most people who attempt it at home end up with visible clipper lines rather than a smooth graduation. Stick to edge maintenance at home and leave the blend to your barber.
Does a mid taper work on all hair types?
It works on all hair types, but the best variation differs significantly. Fine hair needs a shorter top to avoid the flat, limp look that longer lengths create. Thick hair benefits from interior thinning before the taper blends in. Curly and coily hair needs dry cutting on the top section so the barber can see the natural shrinkage. Wavy hair gets the widest range of style options. The taper itself is executed the same way across hair types — it’s the top styling that changes.
The mid taper haircut lands in a practical middle ground: clean enough for professional settings, versatile enough for casual wear, and compatible with almost any hair type when the top style is matched to your texture. Whether you’re after a low-maintenance textured crop or a high-contrast skin fade with a designed top, bring one or two reference photos from this collection to your next appointment and discuss the guard numbers and top length with your barber before they start. Specificity upfront is the difference between a cut you love at week one and one that still looks right at week three.
Hair results vary based on your natural hair type, texture, density, and condition. Always consult with a licensed barber or hairstylist before making significant changes. Photos may show styled results that require professional tools and products to replicate.