
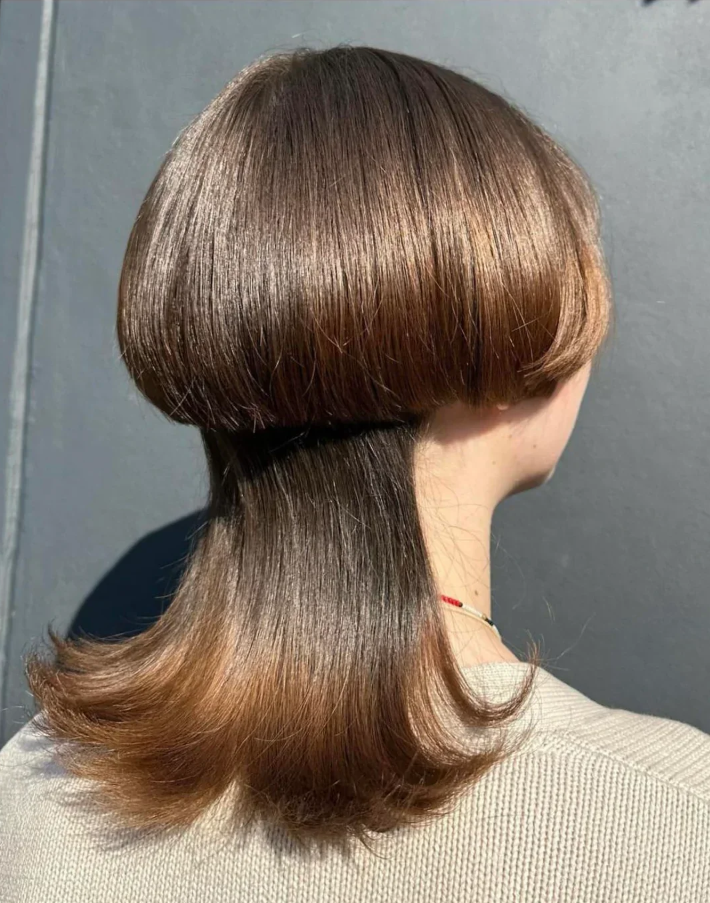

The jellyfish haircut splits into a short, blunt top layer and long disconnected tendrils below — and the gap between them is what makes this silhouette unlike any other layered style.
The jellyfish haircut has two completely separate sections: a blunt-cut layer that ends between ear and jaw length, and a longer underlayer of tendrils hanging below with a visible gap between them. The structure descends from Japanese Hime-cut tradition updated with Western salon layering, and it went viral on TikTok in 2023 because it photographs unlike any other disconnected cut.
This guide covers what sets the jellyfish cut apart from a layered bob or modern mullet, which face shapes and hair types work best, how to calibrate the length gap for your proportions, and the exact salon language to get the version you want. The 15 variations below range from classic dark-top-light-tendrils to wavy, curly, and color-forward interpretations.
What Makes the Jellyfish Cut Different from Other Layered Styles
Unlike a shag haircut or a standard layered cut, the jellyfish cut does not blend its sections. The top layer and the underlength are deliberately kept separate: no graduation, no feathering between the two zones. A stylist creates a clean interior guideline where the top section ends, and the underlayer hangs freely below without being connected into it. This disconnection is the defining technical step, and a jellyfish cut done by someone unfamiliar with the technique often ends up looking like a long bob with heavy layers rather than the structured two-part silhouette.
The Hime cut is the clearest ancestor: a Japanese tradition of keeping a defined shorter front frame over longer flowing hair. The jellyfish modernizes that concept by applying the separation across the whole head rather than just the front section, and it frequently pairs the structural gap with color contrast between the layers. A mullet has a similar short-front, long-back concept but achieves it through a continuous fade or blend. The jellyfish is more precise: two distinct zones with a visible air gap maintained between them.
Stylist tip: The gap height determines the whole character of the cut. A top layer ending at ear level with tendrils reaching mid-back looks editorial and dramatic. The same underlength with a chin-length top reads as softer and more compatible with daily professional settings. Pin down the gap size with your stylist before scissors are picked up, not partway through the cut.
Classic and Straight Hair Jellyfish Cuts
Straight hair shows the jellyfish cut’s two-zone structure most clearly because there is no natural texture to soften the transition between sections. These five variations illustrate how the proportions shift as the top layer moves from ear level to chin length, and how underlayer length affects the overall balance of the silhouette.
1. Classic Blunt-Top Jellyfish on Dark Straight Hair
Scissors cut flat across an interior guide create the clean ceiling of the top section; the underlayer is left entirely untouched through that same cut, which means the stylist must section the hair into two independent zones before making any cuts to keep them completely separate. On dark straight hair, the contrast between the defined blunt edge and the hanging underlength is at its sharpest. A mid-back underlength is the most dramatic ratio here, though reaching that length takes 12–18 months of growth if you are starting from shoulder length.
2. Proportions for Oval and Heart-Shaped Faces
Oval and heart-shaped faces handle the jellyfish cut’s horizontal emphasis at the top layer without any proportional modifications, since both shapes have balanced vertical proportions that are not disrupted by a blunt line across the crown. Heart faces specifically benefit from tendrils that reach at least collarbone level, where the added width at the lower face balances a narrower chin. Positioning the top layer slightly below the cheekbone rather than at it also softens the cut’s edge for heart shapes.
3. Chin-Level Top Layer with Shoulder-Length Tendrils
Bring this photo and ask for “a disconnected two-layer cut: the top section blunt at chin length, the underlayer kept at shoulder length, with no blending or graduation between the two.” That phrasing distinguishes the jellyfish from a heavy-layered long bob, which stylists may reach for if the instruction is not specific enough. A chin-level top with shoulder-length tendrils is the most wearable daily ratio, balancing the cut’s structural drama with proportions that work in most settings.
4. Thick-Hair Jellyfish with Point-Cut Tendrils
Thick hair is the strongest candidate for a jellyfish cut because the underlayer has enough natural density to hang with movement rather than looking sparse. Point cutting through the underlength removes bulk without shortening the overall length and prevents the tendrils from clumping into a single heavy curtain. Ask specifically for point cutting on the underlayer from mid-shaft down; a blunt cut on thick tendrils creates a rigid, panel-like drape that loses the airiness the structure depends on.
5. Short Tendrils for a Lower-Commitment Version
Keeping the underlayer at collarbone length rather than waist or mid-back reduces the daily styling commitment substantially. The top section still needs a trim every 5–6 weeks to keep the blunt line sharp, but shorter tendrils stay in proportion with less product, dry faster after washing, and are easier to manage in high-humidity climates. This version also works more comfortably in settings where extremely long underlengths would stand out.
Wavy and Textured Jellyfish Interpretations
Wavy and curly textures change the visual weight of the jellyfish considerably. The underlayer no longer hangs as a flat, graphic panel; texture adds movement, dimension, and volume that straight-hair versions cannot replicate. The top layer still needs to stay sharply blunt to provide contrast against the textured underlength below it.
6. Air-Dried Wavy Jellyfish
Air-drying the underlayer brings out its natural wave pattern and adds volume that straight versions cannot replicate at the same length. Work a curl-enhancing cream through the tendrils while damp, scrunch upward, and leave completely undisturbed while drying to let the wave pattern set without frizz. The top section can be air-dried straight or given a quick blow-dry for a clean blunt contrast against the textured underlength.
7. Wavy Jellyfish Versus a Blended Shag
Where the shag blends its layers from crown to ends in one continuous graduation, the jellyfish keeps its zones deliberately separate, which means the gap between top layer and underlength is the whole point rather than something to be feathered away. On wavy hair the distinction softens after several weeks of growth, which is why regular trims to the top layer matter more with a jellyfish than with a shag. If grow-out behavior and a relaxed maintenance schedule are priorities, a wolf cut will suit you better; the jellyfish rewards consistent upkeep to stay structured.
8. Bleached Underlength with Dark Natural Top
A bleached underlayer against a natural-tone top is the most photographed version of this cut because the two-tone effect mirrors the structural gap and makes both sections visually distinct at a glance. Lifting the underlength to platinum or ash blonde typically requires 2–3 sessions on dark base hair, plus a regular toner commitment to prevent warmth from developing in the bleached zone. Budget for combined top-layer trims and toner appointments every 4–6 weeks to keep both elements looking sharp at the same time.
9. Blunt Bowl Top with Curtain Fringe
Curtain bangs incorporated into the jellyfish top layer add a forward-falling frame that softens the blunt line across the crown without breaking the two-zone structure. The technique requires the stylist to cut the fringe section separately from the bowl perimeter so the curtain falls independently and can be tucked behind the ears or worn forward depending on the day. Straight, fine-to-medium hair gets the cleanest result with this combination; very thick hair may need internal thinning in the fringe section to prevent it from pushing forward too heavily.
Color Contrast and Statement Jellyfish Variations
Color contrast is not required for the jellyfish cut, but it is one of the most effective ways to make the two-zone structure legible from a distance. These three entries show how different approaches to color in the underlength change the overall impact of the silhouette.
10. Adjusting the Top Layer for Round and Long Faces
Round faces need the jellyfish top layer to avoid ending at the widest point of the face, which would frame and emphasize that width. Positioning the top layer at ear level or above pushes the horizontal emphasis upward and lets the tendrils create a lengthening vertical line. Long faces benefit from the same ear-level top because the blunt horizontal line across the head provides visual width that elongated proportions typically need to look balanced.
11. Fashion Color in the Underlength
Book a consultation before your cut appointment if you plan to add a fashion color to the underlength, since your stylist needs to assess how many lightening sessions are needed before the color can be applied evenly. Bringing a single reference image showing both the cut structure and the color direction in the same photo communicates both changes at once and reduces the risk of misalignment. Vivid fashion colors in the underlength fade faster than semi-permanent tones, so plan for a color refresh every 6–8 weeks to maintain saturation.
12. Naturally Curly Underlength
Curly underlengths give the jellyfish silhouette its most volumetric shape because the curl pattern widens the tendrils as they hang rather than letting them fall in narrow, flat columns. The underlayer needs to be cut dry so the stylist can see the actual resting curl length rather than the stretched wet measurement. Because curly tendrils shrink significantly when dry, a curly jellyfish will look noticeably shorter than a straight or wavy version cut to the same guide length.
Softer and Wearable Jellyfish Modifications
The variations below reduce the contrast of the jellyfish structure without eliminating it. These suit those who want the two-length concept without committing to a sharp, maintained air gap or an extremely long underlength.
13. Managing Grow-Out Between Appointments
The top section and underlength grow out at the same rate but require trimming on different schedules: the blunt top line shows visible grow-out within 5–6 weeks, while the underlength can go 8–10 weeks between trims before losing its shape. Scheduling two top-layer trims per underlength trim keeps the structure looking defined at all stages. If both sections reach similar lengths without maintenance, the gap collapses and the jellyfish structure disappears into a standard layered cut.
14. Textured Top Layer with Sleek Straight Tendrils
Styling the top section with a matte texturizing paste and the underlength with a lightweight hair oil creates a rough-versus-sleek contrast that sharpens the visual line between the two sections. Apply the paste to dry hair in the top section and work it backward from the hairline to build definition without flattening. Run two to three drops of a lightweight oil through the underlength from mid-shaft to ends for shine and separation without added weight.
15. The Soft Jellyfish: When the Gap Becomes Subtle
A long bob with a blunt interior layer cut to a noticeably different length is structurally the starting point of a jellyfish, so the difference between a “soft jellyfish” and an interior-layered layered lob comes down entirely to how deliberately the gap is preserved at each appointment. When the gap shrinks to less than two inches and the ends are blended, the style reads as a layered lob rather than a jellyfish. The soft version suits those who want two-length interest without committing to a defined gap at every trim.
How to Choose the Right Jellyfish Cut for Your Face Shape
The top layer’s ending point is the most important proportional decision for face shapes — a zone of roughly one to two inches between just below the ear and just above the jawline covers most cases. Too low and the horizontal emphasis lands at the wrong place; too short and the jellyfish proportions look top-heavy. For a broader breakdown of how cut structure interacts with facial geometry, the face shape guides on THP cover each shape in more detail.
When a Jellyfish Cut Is Not the Right Choice
The jellyfish works on a wide range of textures and face shapes, but some circumstances create a genuine mismatch.
- Very fine or low-density hair: The underlength needs weight and density to hang with presence. On fine, low-density hair the tendrils look sparse rather than sleek.
- Conservative dress code environments: The jellyfish reads as a fashion-forward, high-contrast cut even at its softest interpretations.
- Curly hair without a specialist stylist: A curly jellyfish needs a stylist experienced in dry cutting for curly patterns. Most general stylists cut curly hair wet, which leads to the underlength ending up shorter than expected once dry.
- Infrequent salon visitors: The top layer needs trimming every 5–6 weeks to maintain the blunt line. Missing even one appointment starts to blur the gap that defines the entire structure.
What to Tell Your Stylist
The words that tend to cause miscommunication with this cut are “layered” and “long bob.” Use this language instead:
“A disconnected two-layer cut. The top section ends blunt at [ear / chin / jaw] level. The underlayer stays at [collarbone / shoulder / mid-back]. There is no blending or graduation between the two zones — I want a clear gap between the top and the underlength.”
Show a photo that includes a clear view of the gap from a three-quarter or back angle rather than a front-only view, which can flatten the two-zone depth.
Stylist tip: If your current hair is all one length, your stylist will need to work in two completely independent sections to achieve the disconnection. A stylist who suggests blending the two “just a little” is describing a different cut.
Maintenance and Styling
The top layer needs a trim every 5–6 weeks to keep the blunt line clean; the underlength can go 8–10 weeks. Running both on separate appointment cycles is more cost-effective than trimming both at every visit.
For daily styling: a matte texturizing paste or fiber on the dry top section adds definition. For the underlength, a lightweight smoothing oil (two to three drops from mid-shaft to ends) keeps straight tendrils sleek. Wavy underlengths respond better to a curl-enhancing cream applied to damp hair, followed by air-drying without heat.
FAQ
What Is the Difference Between a Jellyfish Haircut and a Hime Cut?
The Hime cut features shorter layers framing the front and sides over a longer back, with structure visible primarily from the front. The jellyfish applies the disconnected-layer concept across the entire circumference of the head, so the two-zone structure is equally visible from the back and sides. The jellyfish also involves a shorter, more dramatic top section with longer tendrils, while the Hime cut typically maintains a longer overall length through the back.
Can I Get a Jellyfish Haircut on Curly Hair?
Yes, but it requires a stylist with dry-cutting experience for your specific curl pattern. Curly hair cut wet will be shorter than expected once it dries, and the gap measurement taken wet will not match the resting dried result. The curly jellyfish has a very different character from the straight version: the tendrils widen and coil outward, creating a more sculptural, high-volume silhouette at the underlength.
Is the Jellyfish Haircut Suitable for Fine Hair?
Fine hair can support a modified version, but the standard dramatic gap and long tendrils do not translate well on very fine or low-density hair. The best approach for fine hair is a shorter collarbone-length underlayer, a smaller gap between sections, and point-cut ends through the underlength to add separation and movement without removing more weight.
What Is the Difference Between a Jellyfish Cut and a Mullet?
A mullet transitions from shorter front and sides to longer back through a gradual blend or fade, creating one continuous silhouette with length contrast. The jellyfish keeps its two sections completely separate with a clear visible gap between the top layer and the underlength. A mullet reads as one flowing shape; the jellyfish reads as two distinct zones that happen to occupy the same head.
How Long Does It Take to Grow Out a Jellyfish Haircut?
Growing out the jellyfish structure typically takes 9–18 months depending on how long the underlayer is. The most natural transition path is to gradually shorten the underlength at each appointment until it meets the growing-out top layer, shifting the style through a layered lob or shag phase along the way.
How Much Does a Jellyfish Haircut Typically Cost?
A jellyfish cut typically runs $60–$120 for the cut alone at most salons, with prices varying by location and stylist level. If you are adding color contrast between the sections, budget an additional $80–$200 for bleaching and toning the underlength depending on how much lifting is needed from your base color.
A jellyfish haircut works best when both the gap height and the underlength are calibrated for your specific hair type and face shape, not copied from the most dramatic reference photo you can find. Bring two or three photos to your next appointment: one that shows the gap height clearly and one that shows the overall proportions from a three-quarter view. A jellyfish haircut built around your actual proportions and hair density will hold its structure longer and need fewer adjustments between trims. For more inspiration before you book, browse the jellyfish haircut ideas gallery with 25 additional variations.
Hair results vary based on your natural hair type, texture, density, and condition. Always consult with a licensed hairstylist before making significant changes, especially with chemical treatments or dramatic length changes. Photos may show styled results that require professional tools and products to replicate.