

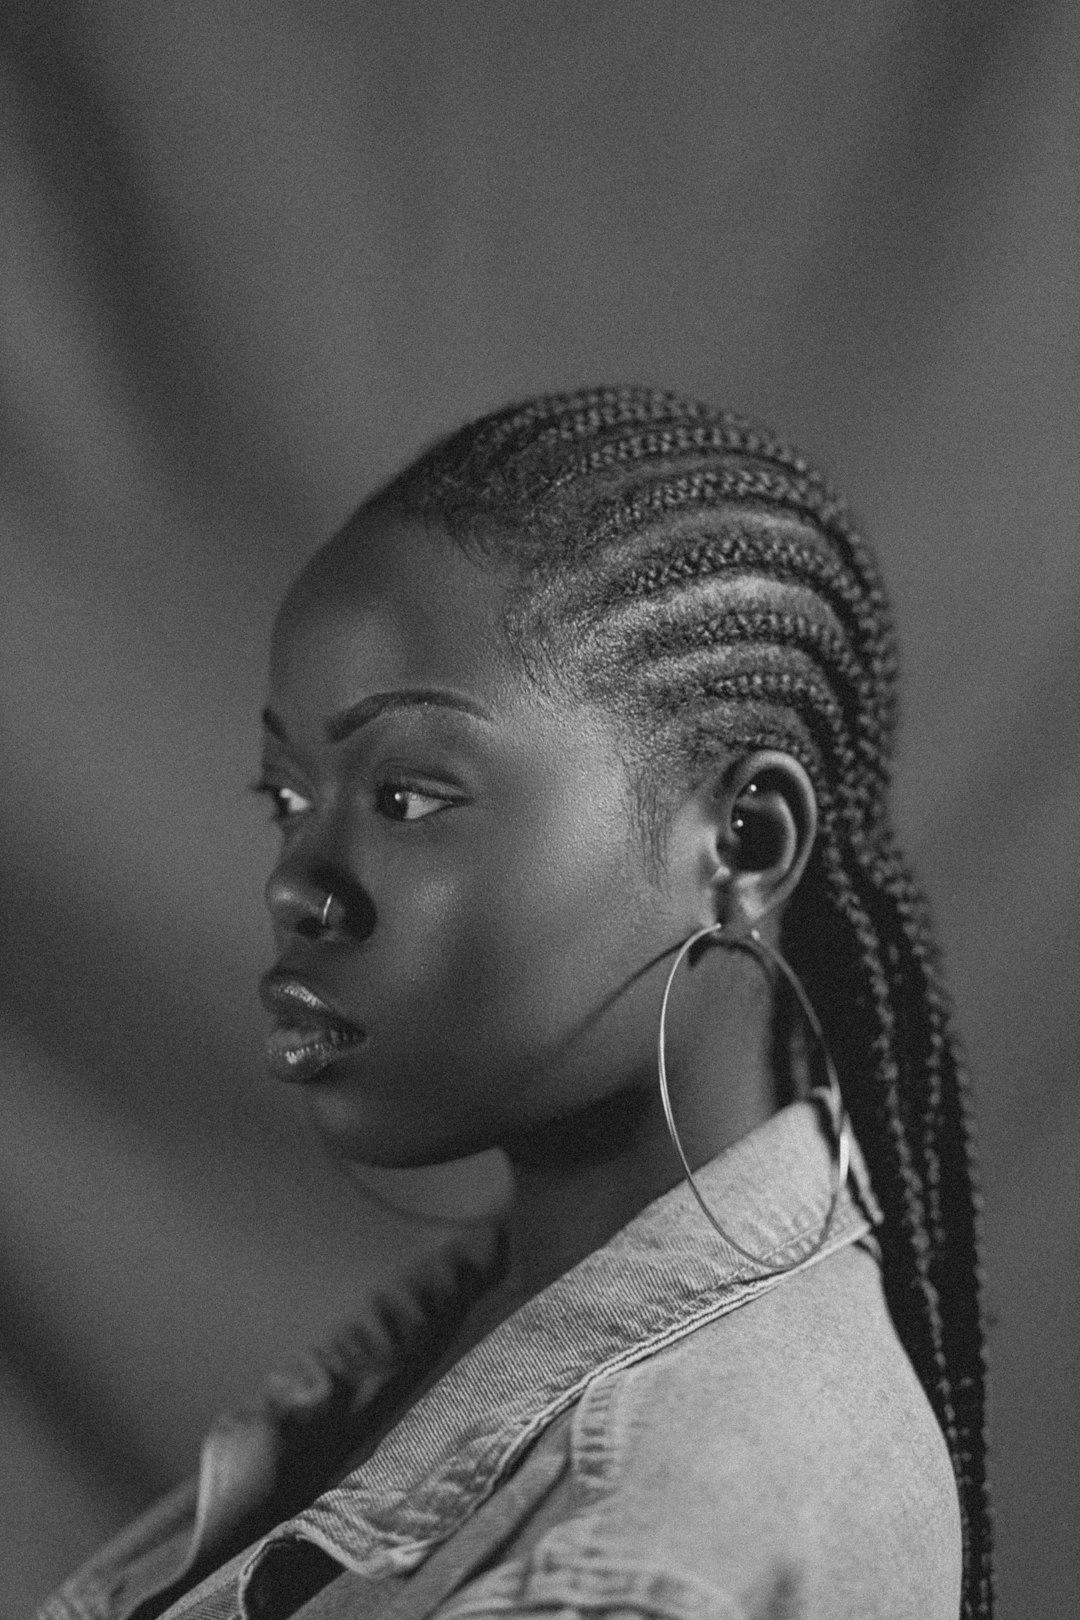

Stitch braids are a cornrow-based protective style where the hair is divided into clean horizontal sections before each braid is formed, creating a segmented, stitch-like pattern across the scalp.
The 30 ideas below cover the full range: classic center-part configurations, long waist-length extensions, accessorized versions with beads, updo-ready styles, creative geometric patterns, and short or jumbo variations. Each entry notes the specific detail that defines that look and how it differs from others in the same category. For comparison with other protective cornrow styles, the articles on box braids and knotless braids on THP cover the key distinctions.
After the gallery, this article includes a full how-to section covering how to prepare your hair, what to say at the salon, and a week-by-week maintenance schedule through the full 6-to-8-week lifespan of a stitch braids installation.
| Factor | Details |
|---|---|
| Style type | Cornrow-based protective style using a horizontal sectioning technique |
| Duration | 4 to 6 weeks for type 4 hair; 6 to 8 weeks for type 3 hair |
| Extension hair | Kanekalon braiding hair is standard; pre-stretched preferred for a lighter install |
| Sitting time | 4 to 9 hours depending on braid count, size, and length |
| Best for | Type 3c to 4c natural hair; also works on relaxed hair with enough density |
Classic and Clean Stitch Braids
The most recognized stitch braids configurations are the ones built on straight back or center-part patterns with 6 to 10 medium braids. These five entries cover the foundation looks from which most variations branch out, and they are the most practical starting points for a first stitch braids appointment.
1. Six-Braid Center-Part Stitch Pattern
Six medium braids evenly distributed from a clean center part is the most common stitch braids configuration and the one most stylists produce by default when given minimal direction. The stitch technique shows most clearly in the spaces between braids, where the horizontal sections create the raised segmented look that defines the style. Request a center part specifically if that’s what you want — stylists occasionally default to a slightly off-center or curved part depending on your hairline shape.
2. Side-Part Stitch Braids for Round Face Shapes
A deep side part on stitch braids creates an asymmetrical distribution of braids that shifts visual weight to one side, which adds length to round face shapes by breaking the circular symmetry. The side with fewer braids appears lighter and more open around the face, while the heavier side anchors the style. Side-part configurations also tend to stay cleaner longer at the hairline than center-part versions because the forehead edge is less exposed to daily manipulation.
3. Communicating Braid Tightness Before the First Braid
Tell your stylist before they start: “I want a comfortable tension — tight enough to hold cleanly, but I shouldn’t feel pulling at the roots.” If the first braid is noticeably tight, say so immediately. Adjusting tension after the entire head is braided means removing and re-doing completed work, so a correction on braid one is infinitely easier than a correction at braid eight. Pain during the install is not normal and not something to push through.
4. Type 4c Hair with Precise Stitch Lines
Tightly coiled 4c hair naturally grips at the part line, which means the horizontal sections stay sharply defined without additional product for the first several weeks. A stylist who is experienced with 4c specifically will part through the coils rather than fighting them, which produces a cleaner stitch line than trying to stretch or blow out the hair first. Leave-in conditioner applied 24 hours before the appointment keeps the hair pliable without making it too slippery at the roots to hold the parts cleanly.
5. The 6-Week Timeline in Practice
Weeks one and two are the cleanest, with fresh parts and tight edges. By week three, the new growth at the scalp is visible and the parts begin to soften slightly — scalp oiling and edge control maintain the look without requiring salon intervention. Weeks five and six are the decision point: the style still looks complete from the front but the scalp will show more growth and the parts may be less defined. Most stylists recommend full removal at 6 weeks for type 4 hair to prevent matting and excessive shed hair buildup inside the braids.
Long Stitch Braids with Extensions
Adding extension hair to stitch braids opens the length options from collarbone to waist and beyond. These entries cover long variations with specific notes on how the extension method, color, and technique affect both the look and the maintenance requirements.
6. Waist-Length Stitch Braids with Wrapped Ends
Wrapping the final inch of each braid with thread or a small rubber band seals the extension hair and prevents the ends from unraveling over the lifespan of the style. Waist-length braids carry significant weight at the ends, and the wrapping also reduces the stress on the attachment point where natural hair meets extension hair. Without some form of end sealing, braids at this length tend to start fraying at week three to four as the braiding hair loosens with daily movement.
7. Stitch Braids vs. Traditional Cornrows: The Key Difference
Standard cornrows are built from a solid triangular or rectangular section of hair taken from the scalp to the beginning of the braid, with no interruptions. Stitch braids add one additional step: the section is divided into horizontal sub-sections before braiding starts, and the stylist picks up a thin new row of hair from each horizontal section as the braid progresses. This produces the “stitch” gaps between each pickup point that give the style its name and its distinctly segmented look from above. The underlying cornrow structure is the same; the stitch technique changes how the scalp appears between the braids.
8. Deep Burgundy Braiding Hair on a Dark Natural Base
Dark burgundy extension hair on a black natural base creates a tonal contrast that reads as rich color without requiring any chemical treatment to the natural hair. The color shows most clearly at the ends where the extension hair hangs freely, and the roots blend naturally into the dark base. Pre-stretched kanekalon in burgundy is the easiest form to work with for this look, and the color typically holds through the full 6-to-8-week lifespan without noticeable fading.
9. Feed-In Stitch Braids for a Natural Hairline
Feed-in stitch braids use the feed-in technique specifically at the hairline: the braid starts thin with just the natural hair, and extension hair is gradually added as the braid progresses from the temple toward the crown. This produces a seamless-looking hairline where the braids appear to emerge naturally from the scalp rather than starting thick immediately from the hairline edge. The technique takes longer than a standard stitch start but produces a significantly more natural-looking front perimeter that works for anyone concerned about a bulky or artificial-looking hairline.
10. Stitch Braids and Heart-Shaped Face Proportions
Heart-shaped faces, which are widest at the forehead and narrow toward the chin, benefit from a stitch braids configuration that draws volume away from the forehead. A curved part that swoops back from the temples rather than a straight-across front part reduces the visual width at the forehead. Keeping the braid count moderate rather than high also prevents the style from adding excess volume at the top of the head, which would exaggerate the heart shape’s existing width at the brow.
Stitch Braids with Beads and Accessories
Beads and thread wraps are the most common accessories added to stitch braids, and the decision to include them affects maintenance as well as aesthetics. These five entries cover the practical side of accessories alongside the style options.
11. Discussing Bead Placement and Weight with Your Stylist
Ask your stylist specifically: “How many beads are you planning to add per braid, and where will they sit?” Beads clustered at the ends of waist-length braids add meaningful weight at the attachment point, and over several weeks that weight can cause tension on the braid attachment. Lighter metal or resin beads distributed at intervals across the braid length are gentler on the scalp than a cluster of heavier beads all at one point.
12. Fine Natural Hair with Gold Cuff Bead Ends
Small gold cuff-style beads that slide over the braid end and clamp without threads or elastic are the lowest-tension accessory option for fine natural hair. They add visual finish without gripping the braid tightly, and they can be repositioned as the braids lengthen with new growth rather than needing to be removed and replaced. Gold cuffs on dark braiding hair produce a refined finish that works for professional settings in a way that larger or more colorful beads may not.
13. Protecting Bead-Weighted Braids at Night
Gather braids loosely at the nape before sleeping rather than letting them hang freely, and use a silk or satin pillowcase as a backup even when wearing a bonnet. The goal is to prevent individual beads from catching on fabric or on each other during sleep, which can loosen the attachment point at the end of the braid over time. A pineapple or loose bun at the top of the head works for shorter braids; for waist-length braids, a loose single braid of all the braids together is more practical.
14. Grouped Bead Clusters at the Final Two Inches
Concentrating three to five beads at the last two inches of each braid creates a weighted, sculptural end that frames the face from the front and catches light as the braids move. The cluster approach works best on braids that are at least collarbone length, where the bead group has enough braid above it to balance the added weight. Mixing metallic and matte beads in the cluster adds texture to the ends without requiring color contrast in the braiding hair itself.
15. Beads vs. Thread-Wrapped Ends: A Practical Comparison
Beads are faster to add and easier to swap out mid-style, but they can slip off if not properly secured and may catch on clothing or hair. Thread wrapping (coiling a few inches of embroidery thread around the final section of each braid) is more secure and produces a smoother end that is less likely to snag. Thread adds minimal weight and is the better option for braid ends that will be regularly styled into updos, where loose beads might interfere with the shape or fall out during manipulation.
Stitch Braids Updo and Ponytail Styles
One of the practical advantages of stitch braids is that the extension length can be used to build a range of updos, ponytails, and bun styles throughout the life of the installation. These entries cover how updo styling decisions interact with the braids’ maintenance and longevity.
16. High Bun Built Entirely from Long Stitch Braids
Gathering all braids at the crown and wrapping them into a high bun produces a clean, sculptural look that shows off the stitch pattern along the scalp while keeping the full extension length hidden inside the bun. Use a soft hair tie at the base of the bun rather than a tight elastic, which can cause breakage at the point where the natural hair transitions to extension hair. The bun can be loosened at the end of the day and reset in under two minutes, making this the most versatile daily style for long stitch braids.
17. Stitch Braid Topknot for Oblong Face Shapes
Oblong faces, which are longer than they are wide, benefit from a topknot that adds horizontal width at the top of the head. Securing the braids in a wide, spread-out bun rather than a tight tall bun creates a horizontal emphasis that balances the face’s vertical proportions. Leaving two or three braids out to frame the temples adds additional width at the widest visual point, which further counters the elongated proportions.
18. Asking for Updo-Ready Extension Length
Tell your stylist: “I want the extensions long enough to pull into a high bun: I need at least 14 to 16 inches of braid length from the hairline.” This is specific enough that the stylist can choose the right amount of braiding hair to add. Vague requests like “medium-long” leave room for a result that looks full hanging down but is too short to build a proper bun. If you have a specific updo in mind, describing it or showing a photo is the most efficient brief.
19. Thick 4a to 4b Hair in a Half-Up Stitch Style
On thick 4a to 4b hair, a half-up style (gathering the top four to six braids into a small bun while leaving the rest to hang) manages the volume naturally without requiring pins or heavy product. The loose lower braids balance the gathered upper section, and the style transitions easily from daytime to evening without adjustment. The exposed scalp between the gathered and loose braids is a visual asset on this hair type because the clean stitch lines show clearly at that transition.
20. Refreshing a Ponytail Style at Week Four
By week four, new growth at the hairline may make edges look soft when braids are pulled back. Applying a small amount of edge control with a soft brush before pulling the braids into a ponytail restores the clean perimeter without needing a stylist appointment. Focus the edge control at the temples and nape rather than across the entire hairline, and set with a soft scarf for 15 minutes to hold the edges in place before the day starts.
Creative Patterns and Color Combinations
Beyond the classic straight-back pattern, stitch braids can be laid in diagonal, curved, or geometric configurations that make the parting structure itself a design element. Color choices in the extension hair add another layer of variation without requiring any chemical work on the natural hair.
21. Zigzag and Curved Part Stitch Braids
A zigzag or wave-shaped center part instead of a straight line adds a graphic element to the scalp that is visible from the front and top of the head. Braids laid in a curved pattern, swooping back from the temple and curving toward the crown, give the style a softer, more organic look than the straight-back standard. Ask your stylist specifically for “a curved or swooped part rather than a straight-back” and confirm the direction before they begin, since this parting decision determines the entire aesthetic of the finished style.
22. Individual Stitch Braids vs. Continuous Row Stitch Patterns
An individual stitch braid is a single braid where the stitch sectioning is applied only to that braid’s width. A continuous row pattern creates the stitch effect across a wider section of scalp, more closely resembling a wide cornrow with multiple stitch lines running across it. Individual braids produce a cleaner, more graphic look from the side because each braid’s section lines are visible separately; continuous row patterns look denser and are slightly faster to install. Both produce the same protective benefit and lifespan.
23. Two-Tone Extension Hair for a Subtle Ombre
Using two shades of braiding hair (one slightly lighter than the other) and distributing them across the braids rather than blending them into each individual braid produces a two-tone effect that reads as dimensional color from a distance. The lighter shade on outer braids and the darker shade toward the center creates an ombre-like effect when the braids hang freely. This technique requires no additional color service and produces results that are indistinguishable from a dyed braid look at normal viewing distance.
24. Jumbo Stitch Braids in a Geometric Sectioning Pattern
Jumbo stitch braids use large rectangular sections rather than smaller ones, producing 6 to 8 thick braids instead of 10 to 16 medium ones. The geometric sectioning pattern is a set of diamond or hexagonal parts laid across the scalp before braiding begins, rather than the standard parallel rows. This pattern shows clearly through the wide-gauge braids and creates a distinctive overhead view that photographs well as a flat-lay. Jumbo gauge also reduces sitting time significantly: a 6-braid jumbo install takes 3 to 4 hours compared to 7 to 8 hours for a 14-braid medium install.
25. Stitch Braids Part Placement for Square Face Shapes
Square faces, which are as wide as they are long with a defined angular jawline, benefit from stitch braids that are angled or diagonal rather than perfectly straight back. A diagonal part that runs from the temple toward the crown draws the eye upward and inward, reducing the visual emphasis on the horizontal jawline. Keeping the braids slightly swept to one side rather than perfectly symmetrical also softens the overall geometric impression that straight-back braids can create on a square face.
Short and Jumbo Stitch Braids Variations
Short stitch braids, either worn at natural hair length or with modest extension length to just below the ear or collarbone, offer the same protective and styling benefits as longer versions with significantly less sitting time, maintenance effort, and weight at the ends.
26. Confirming Extension Hair Quality at the Appointment
When you arrive for your appointment, ask to see and touch the extension hair before braiding begins. Kanekalon braiding hair should feel smooth and consistent in thickness, with no obvious rough patches or significant variations in the strand gauge. Pre-stretched kanekalon is softer and lighter than non-stretched and reduces the chance of scalp irritation from the synthetic fiber during the first week. If the hair feels rough or excessively synthetic, it is worth asking whether the salon has an alternative brand before the install begins.
27. Type 3c to 4a Hair That Holds Stitch Lines Naturally
Type 3c to 4a curl patterns have enough coil structure to grip at the horizontal part lines and hold the stitch definition without requiring edge control or gel on the parting itself. This texture range is one of the more forgiving for stitch braids because the natural curl creates a mechanical hold that keeps the scalp-visible sections looking defined even as new growth comes in. Avoid heavy pre-braiding products on this texture; a light leave-in conditioner 24 hours before the appointment is sufficient to provide pliability without reducing the natural grip at the part lines.
28. Scalp Oiling with an Applicator Bottle Between Visits
A narrow-nozzle applicator bottle filled with a lightweight oil (jojoba, grapeseed, or a diluted mixture with water) allows targeted application directly to the scalp along the parting lines without soaking the braids themselves. Apply two to three times per week for type 4 hair, once or twice for type 3 hair. Saturating the braiding hair with oil instead of delivering it to the scalp is a common oiling mistake: it weighs down the braids, attracts lint, and does nothing for scalp health. The applicator nozzle prevents this by directing the product to the scalp surface precisely.
29. Stitch Braids Styled into a Sleek Low Ponytail
Gathering stitch braids into a low ponytail at the nape is the most work-appropriate and understated styling option for the installation. The stitch pattern across the scalp remains visible, the ponytail sits clean and neat, and the style requires minimal daily effort to maintain. Use a covered elastic rather than a standard hair tie to avoid snagging the extension hair, and position the ponytail just above the nape rather than directly at the hairline, where repeated tension can cause friction on the braids closest to the nape.
30. Stitch Braids vs. Box Braids as a First Protective Style
Box braids hang individually from the scalp and swing freely, while stitch braids are anchored flat against the scalp in cornrow-style rows. For a first protective style, stitch braids require less daily management because there are no individual braids to separate or detangle, and the cornrow base stays flatter against the head during sleep and exercise. Box braids offer more versatility in updo styling and can be parted more freely once installed, making them the better choice for those who want maximum daily styling options. Stitch braids are the better choice for those prioritizing low-maintenance wear and a sleek everyday finish.
How to Ask for Stitch Braids at the Salon
Stitch braids is a specific technique. Not all braiding stylists who do cornrows or box braids are familiar with the stitch sectioning method. Before booking, confirm with the salon that their stylists have experience with stitch braids specifically, and ask to see portfolio photos of their completed work.

The four things to communicate at the consultation or in your booking message:
- Part direction and pattern: Straight back, center part, side part, curved back, diagonal, or geometric. Describe the direction clearly or show a reference photo.
- Braid count and size: State the approximate number of braids you want. “About 8 medium braids” or “around 14 small braids” gives your stylist a clear starting target. Fewer, larger braids mean less time and less tension; more, smaller braids mean more time and more definition.
- Extension length: Say where you want the braids to end — “at my collarbone,” “mid-back,” “waist.” This determines how much extension hair the stylist needs to purchase and whether the total price changes.
- Tension preference: Say upfront: “I want comfortable tension, not tight.” Then check in after the first braid and again at the hairline.
Stylist tip: The most important thing you can say during the install is “that’s too tight” — and say it immediately. A stylist experienced with this style will adjust without needing to be asked twice. If they insist the tension must be that tight for the style to hold, that is incorrect: stitch braids hold with moderate tension and do not require scalp pain to stay in place.
“I’d like stitch braids straight back, with a center part, about 10 medium-size braids, and extensions to mid-back. I want a comfortable tension, not tight at the scalp. Can I see the extension hair before you start?”
How to Prepare Your Hair for Stitch Braids
Preparation affects both how the braids look on installation day and how long they last. The four steps below apply to all natural hair types in the type 3 to 4 range.
| Timing | Step | Why It Matters |
|---|---|---|
| 48 to 72 hrs before | Shampoo and deep condition | Clean hair forms cleaner parts; conditioning prevents mid-braid breakage |
| 24 hrs before | Moisturize with a light leave-in | Pliable hair braids more smoothly and holds extensions better at the attachment point |
| Day of | Hair should be fully dry, no heavy oils or gels | Wet or heavily coated hair slips at the part lines and is harder to section cleanly |
| Day of (4c hair) | Stretch or lightly blow-dry on low heat if requested by stylist | Stretching reduces extreme shrinkage that can distort part-line geometry on very tight coils |
Stitch Braids Maintenance Schedule
Following a structured schedule keeps the style looking its best and protects your natural hair throughout the wear period. Most maintenance can be done at home in under 10 minutes.
| Week | What to Do |
|---|---|
| 1 to 2 | Wear a satin bonnet or use a satin pillowcase nightly. Avoid heavy manipulation. Let the braids settle. |
| 3 | Begin scalp oiling 2 to 3 times per week using an applicator bottle. Spritz lightly with a water-based leave-in spray if the scalp feels dry or tight. |
| 4 | Refresh edges with edge control. Wash the scalp gently with a diluted shampoo or scalp cleanser if needed, applied directly to the scalp with a cotton ball or spray bottle. Air dry fully. |
| 5 to 6 | Decide whether to remove. Type 4 hair should be removed at 6 weeks. Type 3 hair can extend to 8 weeks with consistent oiling and edge care. |
| Removal | Detangle in sections, deep condition, then do a light protein treatment if the hair feels limp. Allow 1 to 2 weeks before the next installation to let the scalp recover. |
Stylist tip: The most common stitch braids mistake is leaving them in too long. Shed hair that accumulates inside the braids over more than 6 to 8 weeks can cause significant matting during removal, leading to breakage. A consistent trim to the wearing schedule is better for length retention than trying to extend the style as far as possible.
When Stitch Braids Are Not the Right Choice
Stitch braids work well for most natural hair types in the type 3 to 4 range, but several conditions make a different protective style the better option.
- Active scalp conditions: Braids of any type seal the scalp surface under the style for 4 to 8 weeks. Active psoriasis, seborrheic dermatitis, or scalp infections worsen under braids because the scalp cannot be treated or properly cleaned during the wear period. Treat any scalp condition first, then install the braids once the scalp is healthy.
- Thin or damaged edges: Traction alopecia from previous tight styles means the hairline is already vulnerable. Stitch braids that start at the hairline add tension to exactly the area that needs rest. A protective style that does not anchor at the hairline (such as a loose twist-out or a style that does not touch the edges) is the safer choice while the hairline recovers.
- Very short natural hair: Stitch braids require enough natural hair to grip the extension hair at the scalp, typically at least 2 to 3 inches in the areas where the braids begin. On hair shorter than that, the extension hair may not attach securely and the braids will loosen quickly. Box braids with a small knot or flat twists are better options for very short starting lengths.
FAQ
How Long Do Stitch Braids Last?
Stitch braids typically last 4 to 6 weeks on type 4 hair and 6 to 8 weeks on type 3 hair with consistent maintenance. The limiting factor is usually new growth at the scalp blurring the part lines and the accumulation of shed hair inside the braids. Removing after 6 weeks for type 4 and 8 weeks for type 3 is the recommended maximum to avoid matting during removal.
Do Stitch Braids Damage Natural Hair?
Stitch braids do not damage natural hair when installed with appropriate tension, removed carefully, and worn for the recommended time period. Damage occurs when braids are installed too tightly (causing traction alopecia at the hairline and temples), left in too long (causing matting and breakage during removal), or removed aggressively without proper detangling. A properly executed stitch braids install is a protective style that supports length retention.
How Much Do Stitch Braids Cost?
Stitch braids pricing varies widely by location, braid count, and length. In most US markets, a full stitch braids install ranges from $150 to $300 for a medium-count style with mid-back extensions, with higher prices in major metros and lower prices in smaller markets. Extension hair is sometimes included in the price and sometimes purchased separately, so confirm this when booking. Longer length and higher braid counts add to the base price.
What Is the Difference Between Stitch Braids and Cornrows?
Cornrows are formed by braiding a continuous section of hair flat against the scalp from front to back. Stitch braids use the same cornrow base but add horizontal sub-sectioning within each braid’s lane, creating the raised, segmented appearance that gives the style its name. The stitch detail is visible from above the head and from the front, where the horizontal parting lines create a pattern across the scalp. Without the stitch sectioning, the same braid configuration would be a standard cornrow.
Can Stitch Braids Be Done on Short Natural Hair?
Yes, with at least 2 to 3 inches of natural hair length for the extension to attach securely. On hair shorter than this, the grip point is too close to the scalp to create enough mechanical hold, and the braids tend to loosen rapidly. On short hair, the stitch braids configuration typically uses fewer, wider braids rather than many narrow ones, since wider braids need less grip length to stay secure through the wear period.
How Long Does a Stitch Braids Installation Take?
A typical stitch braids appointment takes 4 to 9 hours depending on braid count, braid size, and extension length. A 6 to 8 braid jumbo install takes approximately 3 to 5 hours; a 14 to 16 braid medium install with waist-length extensions takes 7 to 9 hours. Bringing food, water, and a seat cushion to a long appointment is practical advice most experienced clients follow, since stitch braids are worth the sitting time but it is a long day.
The 30 stitch braids ideas above cover every practical variation of this protective style, from a first installation to a fully accessorized or creatively patterned statement look. The most important decision before any of the style choices is finding a stylist who is specifically experienced with the stitch technique and who installs at a tension level that is comfortable from the first braid to the last. Start there, and the rest of the decisions follow naturally.
Hair results vary based on your natural hair type, texture, density, and condition. Consult a licensed braiding stylist before any protective style installation, particularly if you have scalp sensitivities, active hair loss, or damaged edges. Individual results and wear duration will vary. Photos may show styled or freshly installed results that change in appearance over the wear period.
2 responses