

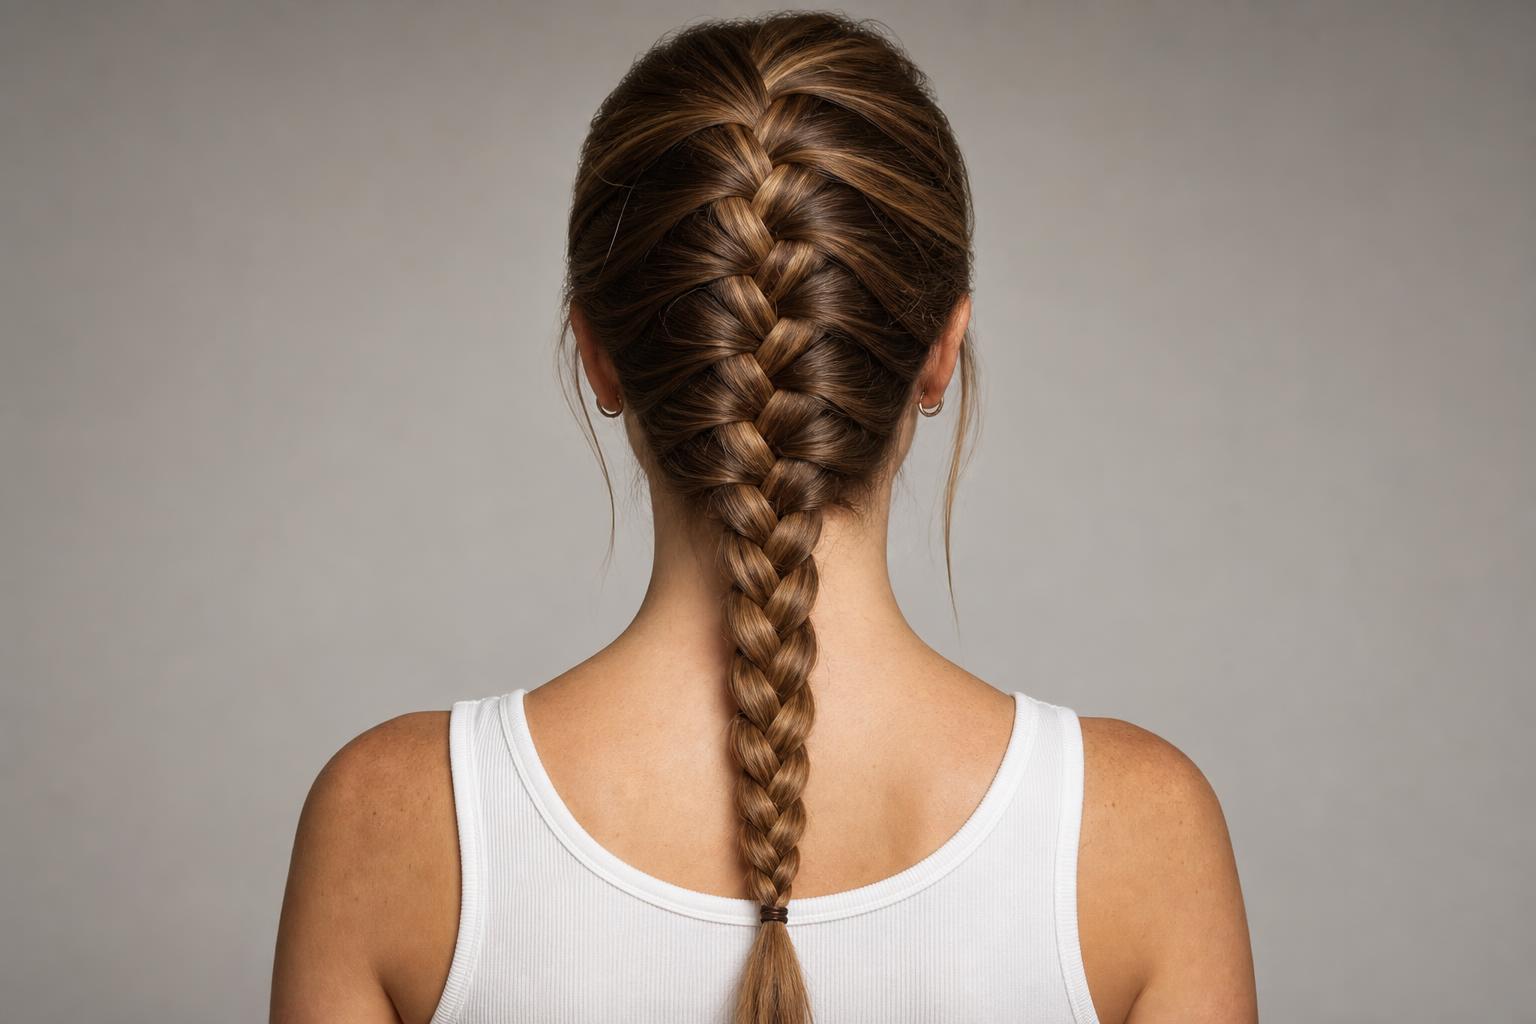
Nearly every failed French braid comes down to one habit: letting go of the tension for a split second while you reach for the next section of hair.
A French braid is a three-strand braid where you add a new section of hair to the outer strand before crossing it over the middle, so the braid grows as it travels down the head instead of hanging from a single anchor point. Cross the outer strands over the middle and you get a French braid, which lies flush with the scalp. Cross them under instead and the same motion produces a Dutch braid, which stands up off the head.
This guide covers the mechanics of the pickup section, a five-step method for braiding someone else’s hair, the adjustments that make braiding your own head possible, a troubleshooting table matching each common failure to its actual cause, and the hair prep that decides whether the braid holds for an hour or a day.
| Factor | Details |
|---|---|
| Hair length needed | Shoulder length minimum for a full braid, chin length for a partial one |
| Time once learned | 3 to 5 minutes on someone else, 6 to 10 minutes on yourself |
| Time to competence | 10 to 15 honest attempts, usually spread over a week or two |
| Works best on | Day-two hair with some grip, any texture from straight to coily |
| Holds for | A full day on textured hair, half a day on silky straight hair |
| Avoid if | Hair is heavily layered above the chin, or freshly washed and slippery |
The Pickup Section Is What Controls the Braid
Everything that separates a clean French braid from a lopsided one happens in the moment you gather new hair. That gathered piece is the pickup, and its size, the width of the strip you take it from, and where along the head you take it all determine what the finished braid looks like. The three-strand crossing itself is the easy part, and almost nobody struggles with it.
Crossing Over Sinks the Braid, Crossing Under Raises It
In a French braid the outer strand passes over the middle strand, which tucks the braid into the surface of the hair so it appears woven into the head. In a Dutch braid the outer strand passes under, which pushes the braid up and out so it stands proud. Same hands, same pickups, opposite result. If your braid keeps disappearing into the hair when you wanted it visible, you are French braiding and you want a Dutch.
Even Pickups Are More Important Than Small Ones
Beginners assume tiny sections produce neater braids. What actually produces a neat braid is consistency: taking the same amount of hair from the same width of scalp on every single pass, alternating left and right without skipping. A braid built from large but perfectly even pickups looks far better than one built from small, erratic ones. Count in your head for the first several attempts if it helps.
Stylist tip: Take your pickups from a horizontal strip that runs from the braid outward to the hairline, not from a diagonal wedge. Diagonal pickups are what make a braid gradually drift off center toward one ear, and it happens so slowly that you do not notice until you are at the nape.
How to French Braid Someone Else’s Hair
Learning on another person first is genuinely easier, because you can see what your hands are doing. Work standing behind a seated person with their head at roughly your chest height, and keep your elbows low rather than raised, which is what causes arm fatigue halfway down. Five steps cover the whole technique.
Step 1: Prepare and Section the Top
What you need: A wide-tooth comb or detangling brush, and a texture spray or dry shampoo if the hair is freshly washed.
How: Detangle fully, then gather a section from the front hairline back to about two inches behind it, spanning temple to temple. Split that section into three equal strands.
Why: Starting with a wide, shallow section rather than a narrow deep one gives the braid a base broad enough to sit flat across the crown.
Common mistake: Grabbing too little hair at the start, which makes the first few crossings pull painfully at the hairline and creates a thin, weak-looking braid top.
Step 2: Make One Ordinary Crossing First
What you need: Nothing beyond the three strands you just made.
How: Cross the right strand over the middle, then the left strand over the middle, exactly as you would start any plait. Do not add hair yet.
Why: That first plain crossing locks the three strands into position so the braid has something to build from, which stops the top of the braid from unraveling as you add.
Common mistake: Adding hair on the very first cross, which leaves a loose loop at the crown that never tightens no matter what you do afterward.
Step 3: Add Hair Before Every Cross
What you need: A free finger on each hand to sweep hair in, ideally your index finger.
How: Before crossing the right strand over the middle, sweep a new pickup from the right side of the head and join it to that strand, then cross the combined piece over. Repeat on the left. Alternate all the way down.
Why: This is the entire French braid technique. Adding before crossing rather than after is what pulls the surrounding hair into the pattern and keeps the braid flat to the head.
Common mistake: Releasing tension on the other two strands while gathering the pickup. Keep both held firmly against the head with your other hand, even if it feels awkward.
Step 4: Follow the Curve of the Skull
What you need: Awareness of where your hands are relative to the head, not the mirror.
How: Keep the braid centered by pulling each crossing straight back toward the nape rather than out to the side. As you pass the occipital bone, angle your hands downward to follow the head’s curve.
Why: The braid needs to stay in contact with the scalp to look woven in. Pulling outward lifts it away and creates a gap between the braid and the head.
Common mistake: Standing to one side while braiding, which almost guarantees the braid drifts toward that side. Stay squarely behind the head.
Step 5: Finish and Loosen Deliberately
What you need: A small elastic, and hairspray only if the hair is very fine.
How: Once you run out of hair to pick up, continue as a plain three-strand braid to the ends and secure. Then pancake by gently pulling the outer edge of each loop outward, working from the bottom up.
Why: Braiding tight and loosening afterward gives a soft finish that still holds. Braiding loosely from the start gives a soft finish that falls apart within an hour.
Common mistake: Pancaking from the top down, which pulls slack out of the braid and loosens the crown before you have finished the bottom.
How to French Braid Your Own Hair
Braiding your own head is a different skill, not a harder version of the same one, because you lose sight of what you are doing and gain a serious arm endurance problem. Three adjustments make it manageable. First, practice with a side braid before attempting a center one, since your hands stay in a comfortable position beside your head rather than above it. Second, drop your elbows every few crossings and rest, because tired arms are why most self-braids get loose halfway down.
Third, stop using the mirror once the braid passes your crown. Beyond that point you are working by feel, and the mirror actively misleads you because everything is reversed. Feel for whether the braid is centered by touching the two pickup zones with your thumbs before each gather. Two mirrors help for checking the finished result, and not for the process itself.
Hold the strands in a fixed pattern to avoid losing track: middle strand pinched between the thumb and index finger of one hand, outer strand in the other hand, and the third held against your head by the fingers of the first hand. Learning that grip is what turns a five-minute struggle into a two-minute routine, and it transfers directly to the waterfall braid, which uses the same hold with one strand dropped each pass.
Stylist tip: Practise your first self-braids sitting on the floor in front of a sofa with your elbows resting on the cushions. Arm fatigue, not hand coordination, is what defeats most people learning to braid their own hair, and removing it from the equation lets you focus on the pickups.
Troubleshooting a French Braid That Is Not Working
Almost every French braid problem has one specific cause, and the fix is rarely “practice more.” Match what you are seeing to the row below and change that one thing on your next attempt.
| What You See | Actual Cause | Fix |
|---|---|---|
| Braid drifts to one side | Pickups are bigger on one side, or taken on a diagonal | Take pickups from horizontal strips of equal width on both sides |
| Braid loosens as you go down | Tension released while gathering each pickup | Pin the other two strands against the scalp with your free hand |
| Loose loop at the crown | Hair was added on the first crossing | Do one plain three-strand cross before you start adding |
| Braid lifts off the head | Crossings pulled outward instead of back toward the nape | Pull each cross straight back and follow the skull’s curve |
| Short pieces escaping everywhere | Layers cut above chin level are too short to be caught | Mist with hairspray before braiding and pin escapees afterward |
| Braid slides out within an hour | Hair is too clean and has no grip | Work texture spray or dry shampoo through the roots first |
| Scalp hurts afterward | Tension pulled upward at the hairline rather than backward | Keep the first three crossings deliberately loose at the front |
Prep Decides Whether the Braid Holds
Freshly washed hair is the most common reason a technically correct braid falls apart, because clean strands are slippery and have nothing to grip each other with. Day-two hair braids better, holds longer, and looks smoother, which is why professional stylists ask clients not to wash the morning of an updo. If you only have clean hair, work a texture spray or a light dusting of dry shampoo through the roots and mid-lengths and give it a minute before you start.
Detangle completely first. A tangle you braid over becomes a knot you cannot remove without cutting, and the braid will also lie unevenly around it. Work from the ends upward with a wide-tooth comb rather than dragging a brush from the roots, and if you are choosing tools, the difference between a wide-tooth comb and a detangling brush matters more on braiding day than on any other day.
Skip conditioner on the lengths the day you plan to braid, or at least keep it well away from the roots. Slip is exactly what you do not want. For overnight results, braiding damp hair and sleeping on it gives you a wave pattern the next morning, which is a useful side effect if you like heatless overnight texture.
French Braiding Textured and Curly Hair
Coily and curly hair is easier to French braid than straight hair, not harder, because the texture grips itself and the braid stays where you put it. What changes is the prep: work on stretched, moisturized hair rather than shrunken dry hair, since shrinkage makes even pickups nearly impossible to judge. Blow-drying on cool with a comb attachment, or banding overnight, both work.
Use a leave-in and a light gel or braid cream on the sections as you go rather than on the whole head at once, which keeps the hair pliable without the product drying out before you reach the nape. Keep the tension moderate at the hairline, where the follicles are finest and most vulnerable to pulling. Anyone braiding regularly should read the tension guidance in our overview of protective braid styles, since the same rules apply whether the braid takes five minutes or five hours.
When a French Braid Is Not the Right Braid
Some hair genuinely fights this braid, and knowing when to switch saves a frustrating twenty minutes:
- Heavy layers cut above the chin. Short pieces cannot be caught by the pickups and will escape within minutes. A low ponytail with a plain braid on the tail, or a half-up style, holds far better on layered hair.
- Hair shorter than shoulder length. There is not enough length past the nape to finish the braid, and it ends in a stub that will not hold an elastic. Two small French braids at the front with the rest left loose work at that length.
- Very fine, silky, freshly washed hair with no product. The braid can be technically perfect and still slide out. Either add grip or choose a style secured by an elastic rather than by friction.
- A tender or sore scalp. The pulling required at the hairline is real, and braiding an already-irritated scalp makes it worse. Wait it out.
- You need it done in under two minutes and you have not practiced. A braided ponytail gives a similar effect and takes a fraction of the skill, since the braiding happens after the hair is already secured.
FAQ
What Is the Difference Between a French Braid and a Dutch Braid?
The direction of the crossing, and nothing else. A French braid crosses the outer strands over the middle, which tucks the braid into the hair. A Dutch braid crosses them under, which lifts the braid up so it stands out from the head. Both use identical pickups, so once you can do one you can do the other immediately.
Why Does My French Braid Keep Falling Apart?
The two usual causes are clean hair and released tension. Slippery freshly washed hair has nothing to grip, so add a texture spray at the roots before starting. The other cause is letting the held strands relax while your fingers reach for the next pickup, which leaves slack that works its way loose over the next hour. Keep both idle strands pinned against the scalp.
How Long Does It Take to Learn to French Braid?
Around ten to fifteen genuine attempts for a passable braid on someone else, and roughly double that on your own head. The crossing motion is learned in a few minutes; what takes practice is consistent pickup size and holding tension without thinking about it. Practising on a doll or a willing friend for a week gets most people there faster than braiding their own hair from the start.
Can You French Braid Short Hair?
Down to about chin length for a partial braid running along the hairline, and shoulder length for a full braid down the back. Below chin length the pickups have nowhere to go and the braid ends before it reaches the nape. Two small braids at the front with the rest left loose is the workaround at shorter lengths.
Should Hair Be Wet or Dry for a French Braid?
Dry, or at most barely damp. Wet hair braids smoothly and then shrinks and loosens as it dries, so a braid that felt tight comes out slack an hour later. The exception is braiding damp hair deliberately overnight to create waves, in which case the braid is a tool rather than the finished style.
How Do I Stop My French Braid From Going Crooked?
Take each pickup from a horizontal strip of hair running from the braid out to the side of the head, and make both sides the same width. Crooked braids are caused by uneven or diagonal gathering, not by uneven crossing. Standing directly behind the person, rather than off to one side, fixes it for most people immediately.
Are French Braids Damaging to Hair?
Not when the tension is moderate and they are taken out the same day. Damage comes from braiding tightly enough to pull at the hairline, and from sleeping in the same braid repeatedly without moving the part. Loosen the first few crossings at the front, take it down before bed or wear it looser overnight, and a French braid protects the ends more than it stresses the roots.
A French braid is one crossing motion plus a consistent pickup, and everything people find difficult about it lives in the tension you hold while your fingers gather the next section. Practise on someone else first, start with day-two hair, and fix one specific thing per attempt using the troubleshooting table rather than starting over from scratch. It becomes automatic faster than almost any other everyday hairstyle worth learning.
Hair results vary based on your natural hair type, texture, density, and condition. Always consult with a licensed hairstylist before making significant changes, especially with chemical treatments or dramatic length changes. Photos may show styled results that require professional tools and products to replicate.
1 response