

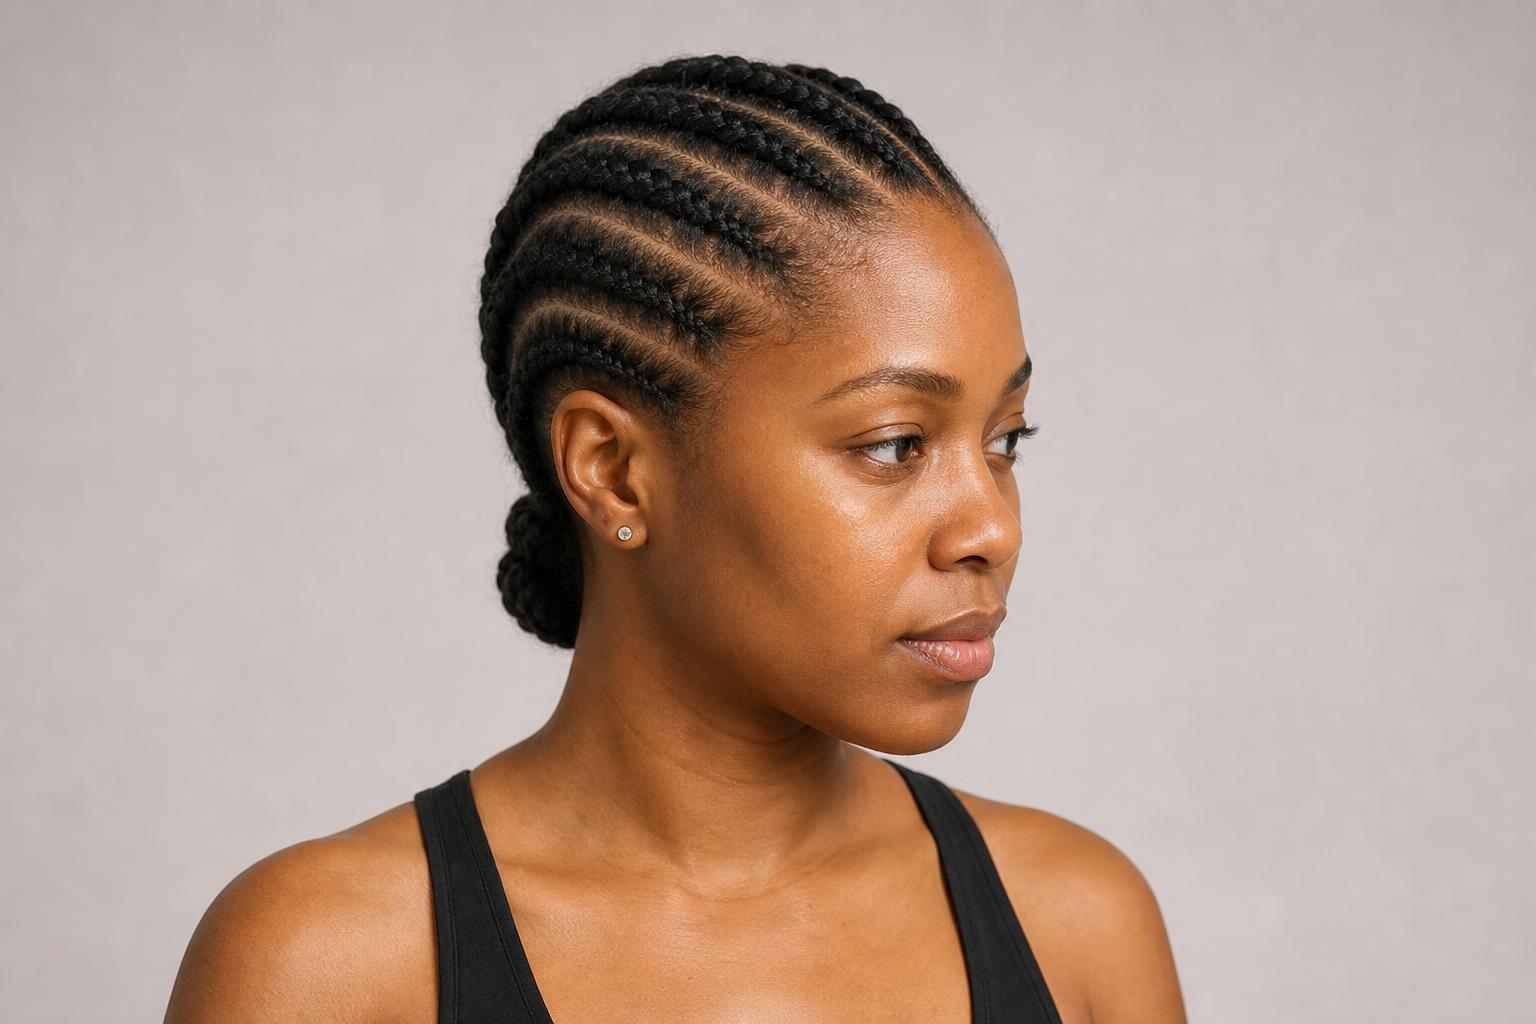
Every all back style is the same braid going the same direction, so the only real decisions are how many rows, how they are parted, and where they end.
An all back is a set of cornrows braided flat against the scalp and taken straight to the nape, and on natural hair it holds for two to four weeks depending on how thick the rows are. The number of rows is the decision that changes everything else: fewer, chunkier rows sit for two weeks and take an hour, while twenty or more fine rows can hold a month and take four. The 25 styles below are sorted by that number rather than by trend.
After the gallery you will find a row-count table that matches density to braiding time and wear length, the exact language to give a braider, an honest section on tension and edges backed by the research, and a takedown routine that does not cost you length.
| Factor | Details |
|---|---|
| Best for | 3c to 4c natural hair, at least three inches long, with healthy edges |
| Braiding time | 1 to 4 hours depending on row count and whether extensions are fed in |
| Wear time | 2 weeks for chunky rows, up to 4 weeks for fine rows with extensions |
| Avoid if | Your edges are thinning, or your scalp is sore from a previous style |
| Upkeep | Scalp oil twice weekly, a satin scarf nightly, no re-tightening of the edges |
Classic Straight-Back Rows
The plain version is the one most people mean by an all back: parallel rows running from the front hairline to the nape with nothing decorative added. Its whole quality comes from the parting, because straight rows on a curved head only look straight if the sections were measured. This is the format to choose when you want the style to disappear under a wig cap, a helmet, or a work uniform.
1. Six Chunky Rows to the Back
Six wide rows is the fastest all back a braider can produce, usually finished in under an hour on medium density hair. The thickness distributes tension across a broad section of scalp rather than concentrating it, which makes this the gentlest option available. Two weeks is a realistic wear window before the roots begin to loosen.
2. Eight Rows with Clean Center Sections
Even numbers part symmetrically down a center line, so eight rows give four on each side and a parting that reads straight from any angle. Ask the braider to comb each section with a rat-tail comb rather than fingers, since finger-parted rows drift.
3. Ten Fine Rows on Dense Hair
Dense 4b and 4c hair carries ten rows comfortably because there is enough hair in each section to keep the braid firm without pulling. Thinner density at the same row count produces braids that look sparse and slip within days. Density, not length, is what decides how many rows your hair can hold.
4. Twelve Rows with Feed-In Extensions
Feeding synthetic hair in gradually from the second inch onward adds length and thickness without anchoring extra weight at the hairline. Say feed in from an inch back, nothing at the edge, and the front stays your own hair.
5. Odd-Number Rows with an Off-Center Part
Seven or nine rows cannot split evenly, so the parting sits off-center by design, which suits a face that is wider on one side or a hairline that is uneven. The asymmetry looks deliberate rather than accidental. It also hides a thinner patch on one side more effectively than a symmetric layout.
6. Two Chunky Rows for a Quick Week
Two thick braids take fifteen minutes and are the version to do yourself on a Sunday night. The rows are heavy enough that they hold shape through a workout and come out without a comb.
7. Micro Rows for a Full Month
Twenty or more narrow rows is the longest-wearing all back, holding three to four weeks because each braid is small enough to resist loosening. The cost is a three to four hour appointment and a noticeably tighter feel for the first day. Anyone new to cornrows should work up to this rather than start here.
Patterned and Curved All Backs
Once the rows stop running in parallel, the parting itself becomes the style. Curves, zigzags, and switchbacks all still finish at the nape, so they read as an all back, but the scalp pattern does the visual work. These take longer to part than to braid, which is worth knowing when a braider quotes you a time.
8. Curved Rows Sweeping Toward One Side
Rows parted in a shallow arc that bends toward one ear soften a square jaw and add movement to a style that is otherwise all straight lines. The curve should follow the natural direction your hair grows at the crown, or the roots fight the braid and fuzz within a week. Push the arc further and you arrive at side-swept lemonade braids, which take the same idea across the whole head.
9. Zigzag Partings Between Straight Rows
Alternating a straight parting with a zigzag one creates visible texture on the scalp without changing the braid itself. Because a zigzag section holds slightly more hair at each turn, the braids come out marginally thicker, which reads as intentional dimension.
10. Stitch Braids Taken Straight Back
Stitch braids differ from a standard cornrow in that each stitch is pulled tight and flat, giving the ridged, ribbon-like look that photographs sharply. The technique takes roughly forty percent longer than a plain cornrow of the same size. See our full set of stitch braid styles and what to ask for if this is the finish you want.
11. Fulani-Inspired All Back with a Center Row
Running one row down the center of the head while the rest angle back toward it borrows the Fulani layout without the full cornrow-and-beads treatment. Thin hair benefits here because the center row draws the eye inward. The traditional Fulani braid patterns use the same principle across the whole head.
12. Alternating Thick and Thin Rows
Pairing a wide braid with a narrow one across the whole head creates a striped effect that needs no beads or color to stand out. It also lets a braider work faster than a full head of fine rows while producing a similar visual density.
13. Side-Parted All Back with a Deep Diagonal
A deep diagonal parting starting above one eyebrow gives the front rows more length before they reach the nape, which shows off the braiding on the longest visible run. Round and full faces gain from the diagonal for the same reason a side part flatters them.
14. Reverse Rows Meeting in the Middle
Braiding the top half backward and the bottom half forward so they meet at the occipital bone produces a raised seam across the back of the head. Unlike a plain all back, this version cannot be worn under a tight cap without flattening the seam. Save it for a style you want visible.
All Backs That End in Something
What happens at the nape decides how long the style stays presentable, because loose ends fuzz faster than braided ones. Gathering, curling, or sealing the ends buys an extra week. It also changes the style completely without touching the braiding pattern, which makes it the cheapest way to get two looks from one appointment.
15. All Back into a Low Bun
Gathering the finished rows into a low bun at the nape keeps every end tucked and protected, which is the whole point of a protective style. Secure it with a satin-covered elastic rather than a rubber band, since the friction at the gathering point is where breakage starts.
16. All Back into a High Ponytail
Pulling the rows up rather than down puts tension on the front hairline in the opposite direction from the braid, and that opposing pull is harder on edges than the braid itself. Wear it high for an evening and drop it low the rest of the week.
17. Curled Ends with Human Hair Extensions
Leaving the last three inches unbraided and setting them on flexi rods gives a soft finish against the sharp scalp lines. Human hair takes a curl and holds it through a wash; synthetic needs hot water setting and will not re-curl the same way.
18. Beaded Ends on Shorter Rows
Beads seal the ends and add weight that keeps the braids hanging straight, and on shorter natural hair they solve the problem of ends that will not stay braided. Use a bead cuff rather than a rubber band to hold them, and count on adding twenty minutes to the appointment.
19. Rope-Twisted Ends
Twisting the loose ends into two-strand ropes rather than leaving them free is faster than curling and holds up better through a workout. The twists also come apart in seconds when you want the loose look back.
20. Cornrowed Front with a Loose Afro Back
Braiding only the front third and leaving the rest out gives you the neat hairline of an all back with the volume of loose natural hair behind it. This is the version to choose when your ends are too fragile to braid but your roots need controlling. Expect it to last about five days before the loose section needs re-fluffing.
All Backs on Short and Fine Natural Hair
Short natural hair can absolutely be cornrowed, and the common claim that you need six inches is wrong. Three inches is enough for a braider to hold a section, though the braid will be short and the ends will need sealing. Fine density is the more genuine constraint, because thin sections produce braids that slip rather than hold.
21. Four Chunky Rows on a Short TWA
On a three to four inch teeny weeny afro, fewer and wider rows are the only workable layout, since narrow sections do not contain enough hair to braid flat. Four rows takes twenty minutes and lasts about ten days. Ask for the ends to be sealed with a small elastic rather than left loose.
22. All Back with Extensions Added for Length
Feeding extensions in lets short natural hair carry a full-length all back, but the added weight is exactly what short, fine hair struggles with. Keep the extension weight light and the braids fewer, and take the style down at two weeks rather than four. Where weight is the sticking point, knotless braiding starts with your own hair and adds the extension gradually instead of anchoring a knot at the root.
23. Flat Twists Taken Straight Back
Flat twists use two strands instead of three, which means less tension on the scalp and a much faster install, and they suit fine hair that a cornrow would pull. The trade is longevity, since twists loosen in about a week where a cornrow holds two. They also come out with no comb at all.
24. Half-Cornrowed with a High Puff
Cornrowing the sides and back while gathering the crown into a puff keeps the fragile crown hair out of tension entirely. Anyone regrowing thinned edges should look at this layout first, since it moves all the holding force to the strongest part of the head.
25. Loose Chunky Rows for a Wash-Week Reset
Four or five deliberately loose rows worn for four or five days function as a stretch style rather than a protective one, keeping shrinkage down between wash days. Braid them on damp, product-free hair and unravel before the next wash. It is the lowest-commitment all back there is.
How Many Rows to Ask For
Row count is the single spec that determines your appointment length, your wear time, and how much tension your scalp takes. More rows means smaller sections, which means each braid grips less hair and therefore has to be braided tighter to hold. That is the trade nobody mentions when they recommend a full head of micro rows. Density rather than curl pattern is what sets your ceiling here, and the distinction between curly and coily hair matters less for row count than how much hair actually sits in each section.
| Row Count | Suits This Density | Braiding Time | Realistic Wear Time |
|---|---|---|---|
| 2 to 4 rows | Any density, including fine and short | 15 to 30 minutes | 5 to 10 days |
| 6 to 8 rows | Medium to dense | 45 to 90 minutes | 2 weeks |
| 10 to 14 rows | Dense 4b to 4c only | 2 to 3 hours | 2 to 3 weeks |
| 20 or more rows | Dense, with strong edges and no recent tight style | 3 to 4 hours | 3 to 4 weeks |
| Any count with feed-in | Medium and up; skip on fine hair | Add 45 to 60 minutes | Take down 1 week earlier than without |
Stylist tip: Count the rows in your reference photo before you sit down, and say the number out loud at the consultation. Braiders quote time by row count, and the single most common source of a disappointing all back is a client asking for a photo the braider priced as eight rows when the photo clearly shows fourteen.
What to Tell Your Braider
Braiders work from a small set of specifications, and giving them in order removes almost all room for misreading. The order that works: row count, parting shape, whether extensions are fed in, where the feed-in starts, and how the ends finish. A complete request sounds like ten straight rows, center part, feed-in starting an inch back from the hairline, ends rope-twisted.
Say one more thing before braiding starts, and say it plainly: do not braid my edges in, and stop if I say it is too tight. A good braider hears that as normal information rather than criticism. Edges pulled into the first row are the most common source of long-term damage, and a braider cannot know your history unless you tell them. If you want the front section handled decoratively without tension, our guide to cornrow styles and braider language covers the phrasing for that too.
Tension, Edges, and What the Research Says
Traction alopecia comes from sustained pull on the follicle, and braided styles taken straight back put that pull directly on the hairline. A cross-sectional study of 223 women in Yaoundé found that having hair styled by professional hairdressers only was associated with lower odds of traction alopecia, alongside avoiding the regular use of caps and head ties and relaxing once a year or less, in research published in BMC Women’s Health. The professional-versus-home finding runs against the common assumption that a salon braids tighter than a friend does.
The practical rules that follow are simple. A style should feel snug and never sting; bumps along the parting on day one mean the braid was too tight, not that the style is settling. If you cannot raise your eyebrows comfortably, the front rows need to come out and be redone, and a braider who is worth returning to will do it. Give your scalp at least one week loose between back-to-back braided styles.
Stylist tip: Take a photo of your hairline the day you get braided and another the day you take it down. Edge loss happens too gradually to notice in a mirror, and two photos eight weeks apart tell you more about whether your braider is too heavy-handed than any amount of guessing after the fact.
Maintenance and Takedown
Braided styles fail at the scalp long before they fail at the ends, so upkeep is a scalp routine rather than a hair routine. Apply a light oil directly to the partings twice a week with a nozzle applicator, not to the braids themselves. Sleep in a satin scarf or on a satin pillowcase every night without exception, since one cotton night undoes several days of neatness at the hairline.
Wash while braided by diluting shampoo with water in a bottle, aiming at the scalp only, and squeezing rather than rubbing. For takedown, saturate each braid with conditioner first and unravel from the ends upward, never picking at the roots. Set aside real time; rushing a takedown is where most people lose the length they grew during the style. Follow it with a clarifying wash to clear the oil buildup, then a deep conditioner, and give the hair a full moisture-focused product routine for a few days before the next install.
FAQ
How Long Do All Back Styles Last on Natural Hair?
Two weeks for six to eight chunky rows and three to four weeks for fine rows or feed-in braids. New growth at the roots is what ends the style rather than the braid coming undone, so denser, faster-growing hair reaches the limit sooner. Wearing a style past four weeks risks matting at the base, which costs you length at takedown.
Can I Get an All Back on Short Natural Hair?
Yes, from about three inches, though the row count has to drop to four or fewer so each section holds enough hair to braid flat. The ends will be short and need sealing with a small elastic or a bead. Flat twists are the better option below three inches, since two strands need less length to grip than three.
Do All Back Braids Help Hair Grow?
They protect the ends from daily manipulation, which reduces breakage, and that is what people are seeing when they say braids grow hair. Growth itself happens at the follicle and is unaffected by the style. A style that is too tight actively works against you, so the protection only counts when the tension is right.
How Do I Stop the Braids from Getting Frizzy?
A satin scarf every night handles most of it, since friction against cotton is what lifts the hairs out of the braid. A light mousse smoothed over the rows on day seven refreshes the surface without adding buildup. Avoid re-braiding the front rows to tidy them, because repeated re-tightening at the hairline is the fastest route to thinning edges.
Should I Wash My Hair Before or After Braiding?
Before, and let it dry completely first. Braiding damp hair traps moisture against the scalp for days and produces the sour smell people blame on the extensions. Wash, deep condition, stretch the hair with blow-drying on cool or with banding, and go to the appointment with dry, detangled hair.
What Is the Difference Between an All Back and Regular Cornrows?
An all back is a cornrow layout rather than a different braid, defined by every row running in the same direction and ending at the nape. Regular cornrows can curve, cross, meet, or feed into other patterns anywhere on the head. Every all back is a cornrow style; most cornrow styles are not all backs.
How Much Should an All Back Cost?
Pricing varies enormously by city and braider experience, and it tracks row count and time rather than the style name. Expect a simple six-row install to sit at the bottom of a braider’s price list and a twenty-row feed-in near the top. Ask for the quote by row count when you book, since a photo alone leaves too much room for a different reading.
Choosing among all back styles with natural hair really comes down to how many rows your density can carry and how long you need the style to last. Match those two numbers first, name them at the consultation, and treat any stinging on day one as a signal rather than something to sit through. A well-parted eight-row all back done at the right tension will serve you better than a fourteen-row one your scalp cannot hold.
Hair results vary based on your natural hair type, texture, density, and condition. Always consult with a licensed hairstylist before making significant changes, especially with chemical treatments or dramatic length changes. Photos may show styled results that require professional tools and products to replicate.

1 response