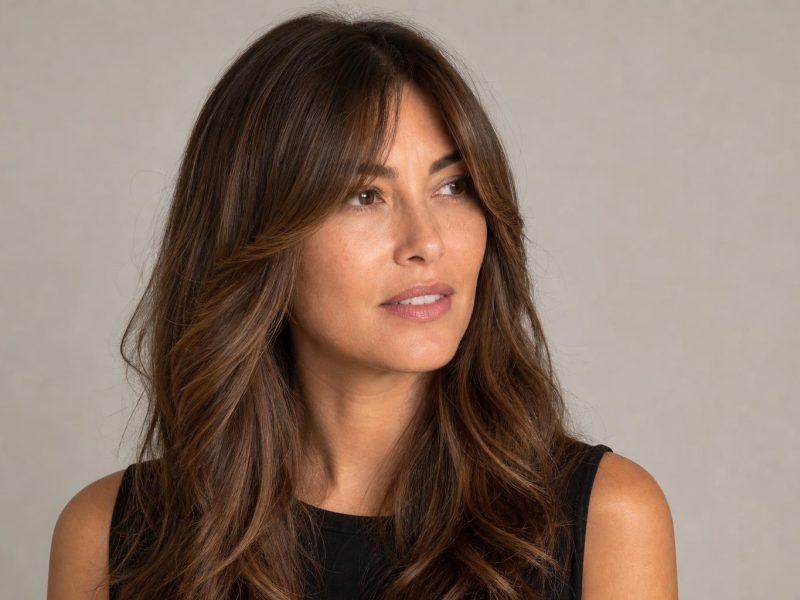

Long layers and bangs only look like one haircut when the shortest layer lands within about two inches of where the fringe ends, and that measurement is the whole decision.
Long layered hair with bangs succeeds or fails on a single detail almost nobody discusses in the chair: the distance between the bottom edge of the fringe and the start of the first layer beneath it. Close that gap and the fringe flows into the layers as one continuous shape. Leave a four or five inch dead zone of unlayered hair between them and you get the effect people describe as bang regret, where the fringe looks stuck onto an otherwise long haircut.
This guide covers how the two cuts join, which fringe pairs with which layer length, how texture and density change what will actually behave, the order a stylist should cut them in, and the maintenance schedule that keeps the join from drifting apart.
| Factor | Details |
|---|---|
| Best for | Medium to thick hair below the collarbone; oval, round, square, and heart faces |
| The key measurement | No more than 2 inches between the fringe edge and the first layer |
| Maintenance | Fringe every 4 to 6 weeks, layers every 10 to 14 weeks |
| Daily styling | 5 to 10 minutes, mostly on the fringe alone |
| Avoid if | Very fine hair with a low density, or a strong cowlick at the front hairline |
Bangs and Layers Are Two Separate Cuts That Have to Meet
A fringe is cut from a triangular section at the front of the head, taken forward and cut on its own. Layers are cut from the interior of the whole head, elevated and graduated. They are different sections, different elevations, and often different tools, which is why a stylist can execute both perfectly and still hand you a haircut that looks assembled from parts. The problem is never the quality of either cut. It is that nobody planned the point where they meet.
Picture the front of your head in profile. The fringe stops somewhere between the brow and the cheekbone. Below that, the next piece of hair that has been shortened is your first face-framing layer. If those two lengths are close, gravity and movement carry one into the other and the eye follows a single line down the face. If they are far apart, there is a band of untouched, one-length hair sitting between them, and no amount of styling hides it.
Stylist tip: Before any cutting starts, ask your stylist to hold a comb vertically against your cheek and point out where the fringe will end and where the first layer will begin. Two seconds of pointing prevents the most common complaint about this haircut.
Fringe Length Determines Where the First Layer Belongs
Once you pick a fringe, the layer placement is mostly decided for you. A short fringe needs the layers to start high or the gap opens up. A long fringe gives you room to start layers lower, which suits anyone who wants to keep weight and length through the mid-lengths. The table below pairs each common fringe with the layer start that keeps them connected.
| Fringe Type | Where It Ends | First Layer Should Start | What Happens If You Ignore It |
|---|---|---|---|
| Blunt fringe | Eyebrow | Cheekbone | A heavy shelf of hair with nothing supporting it below |
| Wispy fringe | Brow to lash line | Cheekbone to top of the nose | The thin fringe looks sparse against solid length |
| Curtain fringe | Cheekbone to jaw | Chin to just below the jaw | The curtain flips outward instead of sweeping back |
| Side-swept fringe | Cheekbone on the long side | Jaw, cut longer on the swept side | The sweep separates and falls into the eye |
| Micro fringe | Mid forehead | Under the eye, plus face-framing pieces | The fringe floats alone with no visual connection |
Curtain shapes are the most forgiving of the five because their longest pieces already reach into layer territory on their own, which is why they dominate every gallery of long layers paired with a curtain fringe. Blunt and micro fringes are the least forgiving and need the most deliberate layer placement to look like a single haircut.
Face Shape Changes the Fringe, Not the Layers
Long layers behave the same on every face. It is the fringe that does the balancing work, because it controls how much forehead shows and where the eye enters the face. Choose the fringe for your proportions first, then set the layers to match it using the pairings above. The full range of shapes and their trade-offs is covered in our breakdown of the main fringe types and who each one suits, but the summary below is enough to walk into a consultation with.
| Face Shape | Best Fringe | Why It Works | Avoid |
|---|---|---|---|
| Oval | Any, including blunt | Balanced proportions carry weight anywhere | Nothing, though very heavy fringes hide the balance |
| Round | Long curtain, parted off-center | Vertical pieces beside the cheeks narrow the width | Blunt fringe at the brow, which cuts the face in half |
| Square | Soft side-swept or wispy | Diagonal movement softens a strong jaw | A hard horizontal fringe, which echoes the jawline |
| Heart | Curtain, split at the center | Covers width at the temples, opens up the chin | Micro fringe, which exposes the widest part |
| Oblong | Full blunt or heavy wispy | A horizontal line shortens the visual length of the face | Long curtain shapes, which stretch the face further |
| Diamond | Wispy or soft blunt | Adds width at a narrow forehead | Tight side sweeps that pull hair off the cheekbone |
Density Decides Whether the Fringe Will Behave at All
A fringe is taken from the front of the hairline, and that hair does not grow back for the length of the cut. On thick hair this costs nothing. On genuinely fine, low-density hair it takes a noticeable percentage of what covers the crown, which is why a fringe on fine hair can leave the parting looking wider than it did before. Two to three wispy pieces on each side is the practical ceiling there, kept deliberately sparse so the fringe borrows very little.
Thick and coarse hair has the opposite job, which is preventing the fringe from turning into a solid block. Internal weight removal behind the fringe line, rather than thinning the visible edge, keeps it moving. Wavy and curly textures need the fringe cut longer than the target, because the curl pattern lifts the ends anywhere from half an inch to two inches once it dries. Anyone with fine hair choosing between fringe weights will find the trade-offs laid out in our comparison of wispy and full curtain fringes.
Stylist tip: If your hair has a cowlick at the front hairline, the fringe has to be cut about half an inch longer than planned on that side. The cowlick pulls hair upward as it dries, and cutting to the target length wet produces a fringe that sits permanently short on one corner.
Layers Get Cut First, the Fringe Second
Cutting order matters more here than in most haircuts. Layers cut after a fringe force the stylist to work around a fixed short length, which usually means overdirecting the front sections and pulling the fringe shorter than intended. Cutting the layers first establishes the internal shape, and the fringe is then cut to meet it. Any stylist who reaches for the front section before touching the interior is building the haircut backwards.
The join itself is made with point cutting or a soft slide cut through the two inches where the fringe corner meets the face-framing piece. Done well, there is no visible step at all, just a gradual shortening from cheek to brow. This is the same principle behind well-executed long face-framing layers, where the shortest piece at the front connects into the length rather than sitting on top of it.
When Long Layers with Bangs Are the Wrong Call
This combination is genuinely flexible, but it is not universal, and the situations below produce disappointment often enough to be worth naming before you commit.
- Your hair density is low and your parting already shows scalp. A fringe removes hair from the front section, and the parting behind it widens further rather than looking fuller.
- You tie your hair back for most of the day. A fringe is the one part of the cut that cannot go into the ponytail, so you are choosing a haircut you will only see in the mirror.
- You have a strong double cowlick at the front hairline. Two opposing growth directions make a fringe split at the center no matter how it is cut or dried.
- You want a genuinely wash-and-go routine. Layers air-dry well; almost no fringe does. Blunt and micro shapes need a round brush and two minutes every single day.
- Your hair is heavily coily at 4a or tighter and you want a smooth fringe. The straightening required to hold that shape daily is more heat than the hairline can take long term.
If two or more of these apply, face-framing layers without a fringe give you most of the same softening effect around the face with none of the daily commitment.
What to Tell Your Stylist
Ask for the join explicitly. Most consultations cover the fringe and the length and skip the part in between, which is exactly where the haircut goes wrong. Try wording close to this: “Long layers with a curtain fringe. Start the shortest layer at my chin so it connects into the fringe, keep the internal layers soft rather than choppy, and leave the perimeter blunt so I do not lose thickness at the ends.”
Name a body part for every length rather than a number of inches. Stylists work from landmarks on your face, and “cheekbone” is unambiguous in a way that “about four inches” is not. If you are asking for the front pieces specifically, the phrasing in our guide to requesting face-framing layers by face shape gives you the exact terms for each variation.
Maintenance and Grow-Out
The two halves of this haircut age at completely different rates, which is why one appointment schedule never covers both. The fringe drifts out of shape within a month; the layers hold for a season. Booking a full cut every six weeks wastes money on length you did not need trimmed, and booking every twelve leaves you with a fringe in your eyes for two of them.
| Element | Trim Interval | Daily Styling | Grow-Out Behavior |
|---|---|---|---|
| Blunt fringe | 3 to 4 weeks | 2 to 3 min with a round brush | Awkward from week 5, splits at the center |
| Wispy fringe | 4 to 6 weeks | 1 min, fingers and a little cream | Softens into face-framing pieces |
| Curtain fringe | 6 to 9 weeks | 2 min, dried away from the face | Grows into the layers with no awkward stage |
| Long layers | 10 to 14 weeks | Air-dry, or 5 min with a diffuser | Loses definition slowly, never looks unkempt |
| The join between them | Every fringe trim | None | Gap widens as the fringe grows and the layers do not |
The last row is the one people miss. Every time the fringe grows and the layers stay put, the gap between them opens, and by week eight the haircut has quietly turned back into long hair with a grown-out fringe. Ask for the front corners to be refreshed at every fringe trim, which takes an extra thirty seconds and keeps the shape you paid for. Anyone considering the same softening without a fringe should compare the effect against a straightforward long layered cut with no fringe at all.
FAQ
How Long Does Hair Need to Be for Long Layers with Bangs?
Collarbone length is the practical minimum, and mid-back gives the layering enough room to show movement. Below the collarbone there is not enough distance between the fringe and the ends for layers to graduate visibly, so the cut behaves more like a long shag. If your hair is shorter than that and you want both elements, a longer curtain shape with face-framing pieces gives a similar effect without the awkward proportion.
Do Bangs Make Fine Hair Look Thinner?
They can, because a fringe borrows hair from the front of the hairline that would otherwise cover the parting. On fine hair the fix is to keep the section shallow, no more than an inch back from the hairline, and to keep the fringe wispy rather than solid. A deep, heavy fringe on low-density hair leaves visible scalp at the part line and takes six to nine months to grow back in.
Can You Get Bangs with Curly Hair and Long Layers?
Yes, and curly fringes look best when they are cut dry, curl by curl, at roughly twice the length you want them to finish. Wet cutting is the usual reason a curly fringe ends up two inches shorter than expected. Ask for the layers to be cut in the same session so the curl clumps are shaped together, and expect the fringe to need its own product routine, usually a light gel scrunched in and left alone.
How Do You Blend Grown-Out Bangs into Long Layers?
Have the front pieces cut to the length your fringe currently reaches, then have the layers behind them softened to match. This turns the old fringe into the shortest face-framing layer instead of a separate element. The awkward stage runs from roughly weeks six through twelve, and a deep side part plus a clip is the standard way through it.
What Is the Difference Between Face-Framing Layers and Bangs?
A fringe is cut from a section that starts at the front hairline and falls forward over the forehead. Face-framing layers are cut from hair that starts behind the hairline and falls beside the face, never over it. The two do very different jobs, and the confusion between them is behind a lot of unwanted haircuts, since asking for face-framing and receiving a fringe is a much bigger change than most people expect.
How Often Do Bangs Actually Need Trimming?
Every three to four weeks for a blunt shape and six to nine for a curtain, based on average growth of about half an inch a month. Curtain and wispy shapes buy more time because their edges are already broken, so a quarter inch of growth barely changes them. Many salons trim a fringe free between appointments, and asking about that policy at your next cut is worth the thirty seconds.
Long layered hair with bangs is one haircut, not two, and every good version of it comes down to controlling the distance between the fringe and the first layer beneath it. Pick the fringe that suits your proportions, set the layers to meet it, and ask for the join to be refreshed whenever the fringe is trimmed. Walk into your appointment naming landmarks on your face rather than inches, and the cut you leave with will hold its shape for the whole three months you paid for.
Hair results vary based on your natural hair type, texture, density, and condition. Always consult with a licensed hairstylist before making significant changes, especially with chemical treatments or dramatic length changes. Photos may show styled results that require professional tools and products to replicate.